NavigationStack — Pushing, Popping, and Programmatic Paths
Most iOS apps with more than one screen use push navigation — tap a row, slide in a detail screen, swipe back. SwiftUI’s NavigationStack (introduced in iOS 16, mature in 2026) handles all of it with two new ideas: value-based navigation links and navigationDestination(for:). The old NavigationLink(destination:) still compiles but it’s the deprecated story; new code uses values.
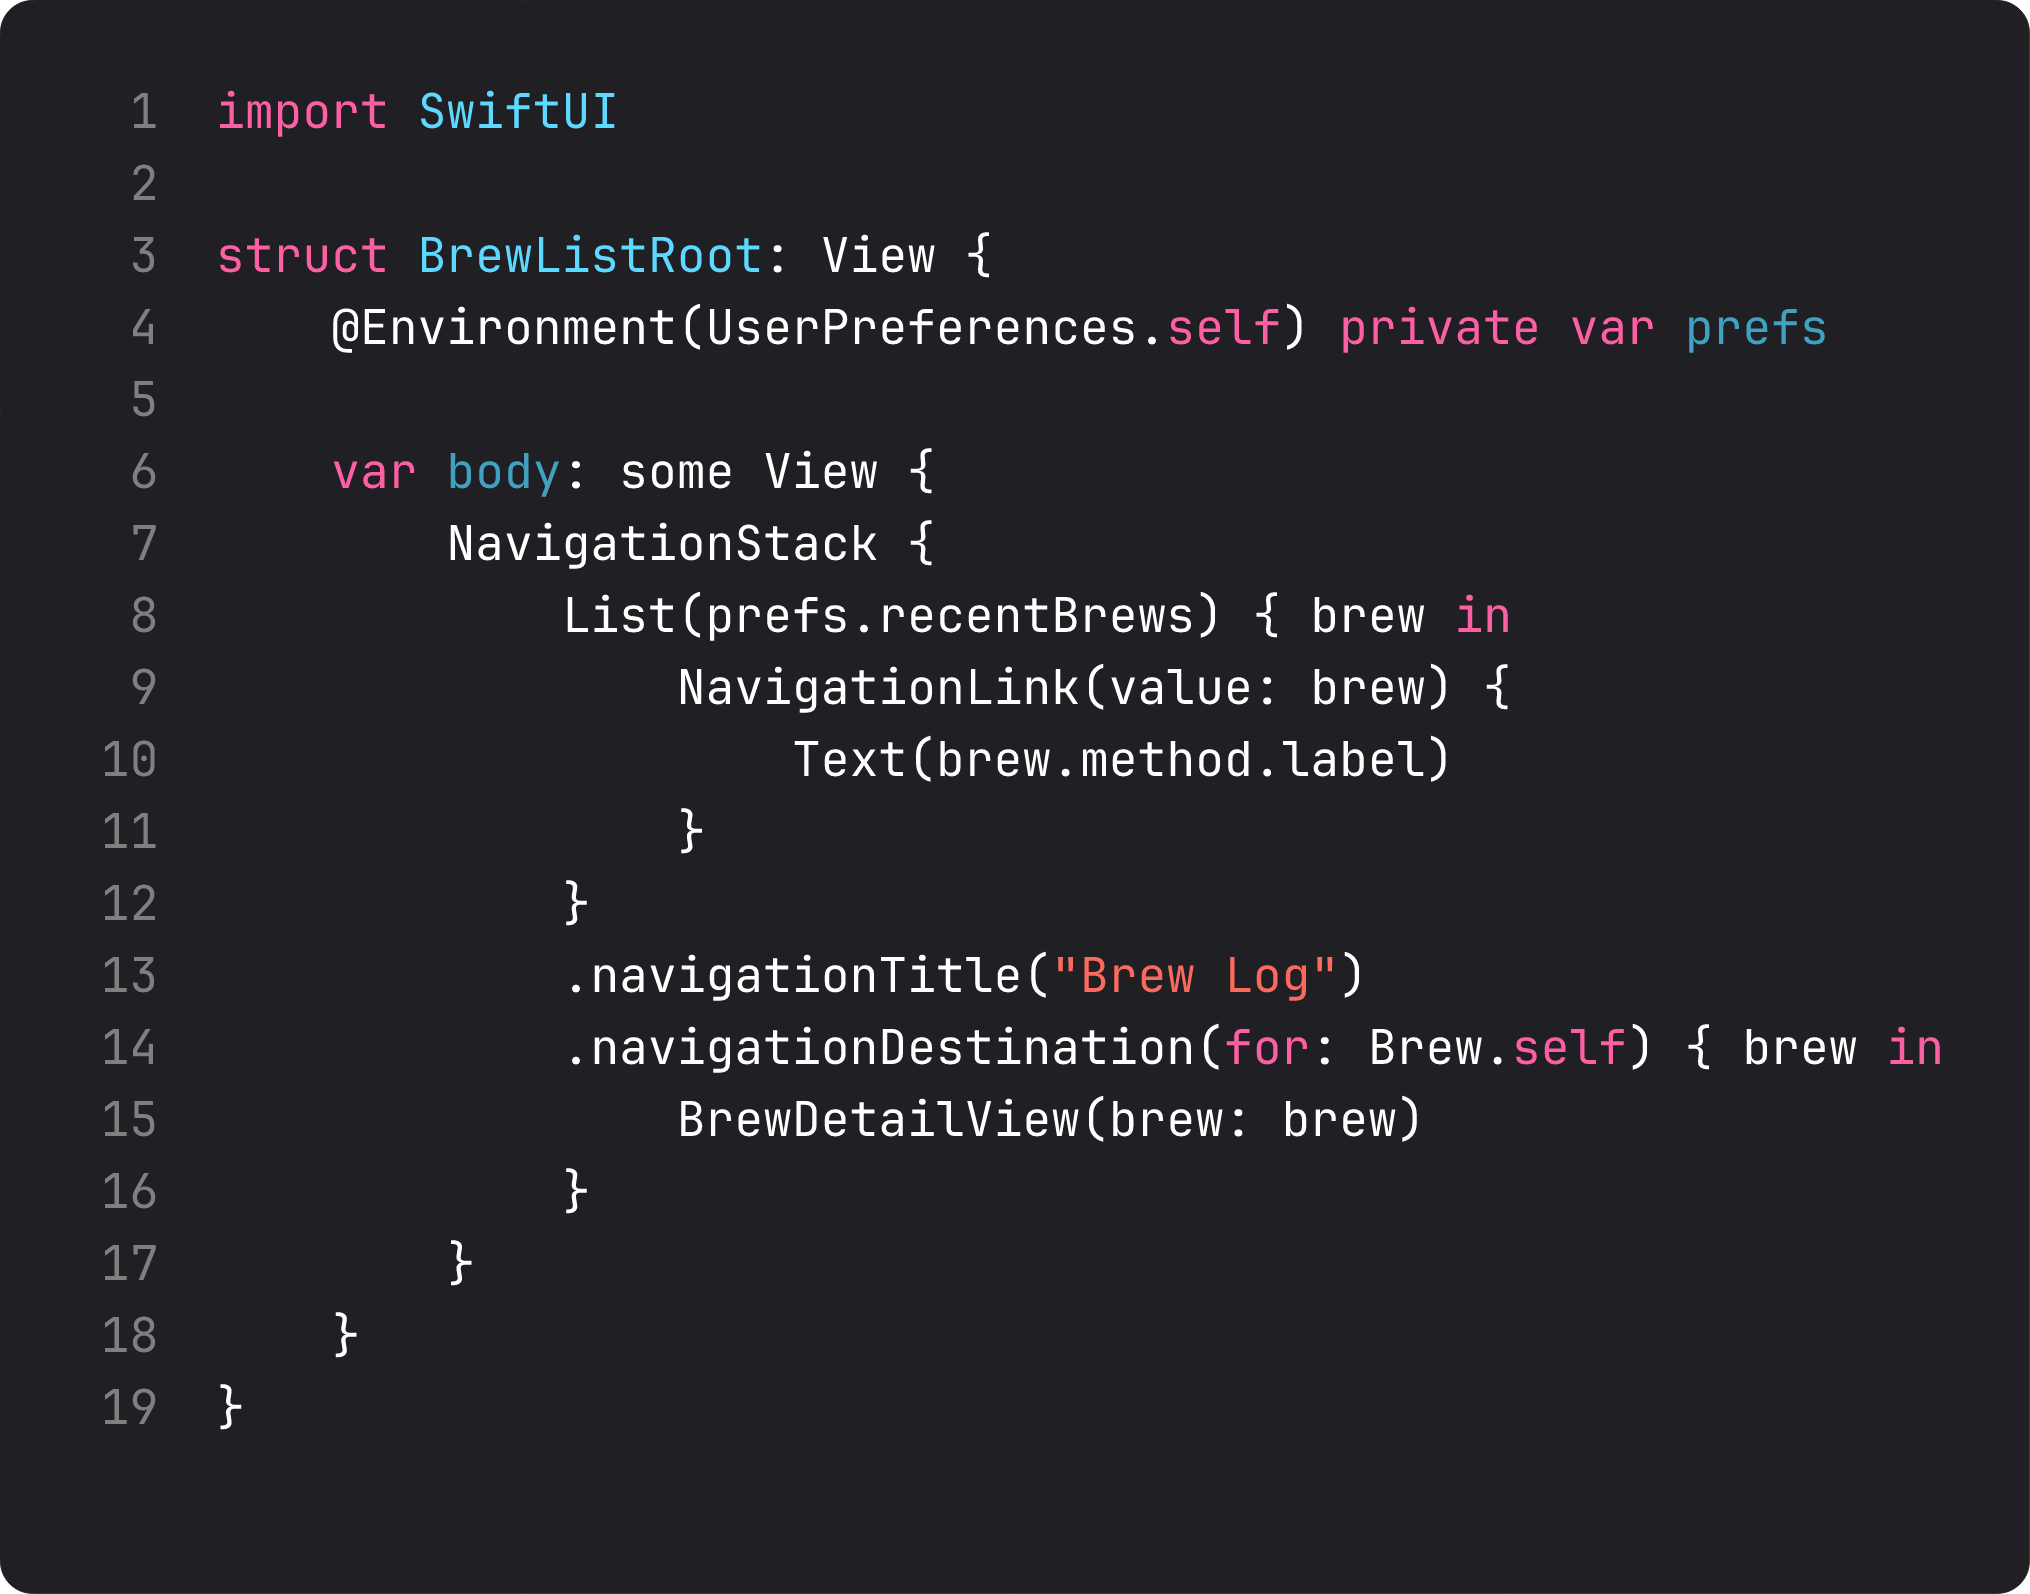
This lesson wraps BrewLog’s home screen in a NavigationStack, makes each brew row tappable, and pushes to a real BrewDetailView with hero icon, full date, large rating, and notes. The whole conversion is roughly 30 lines of code.
Value-based navigation: the new way
Old style:
NavigationLink("Open detail", destination: BrewDetailView(brew: brew))New style:
NavigationLink("Open detail", value: brew)The value-based version is lazy — the destination view isn’t built until the link is tapped. It’s also decoupled — the link doesn’t need to know what view to show; some ancestor in the stack declares that:
The pattern in three lines:
NavigationLink(value: brew)— declare “tapping this should push something for this value.” Doesn’t say what..navigationDestination(for: Brew.self) { brew in BrewDetailView(brew: brew) }— declares the recipe. Wherever you push aBrewvalue into this stack, the detail view is built from it.- The receiver type drives the destination. If you also push
Settings.selfvalues somewhere, you’d add another.navigationDestination(for: Settings.self). Multiple destinations live happily on the same stack.
This is DIP at the navigation layer. The link doesn’t depend on the destination view. Both depend on the value type. Refactoring the detail view, swapping it for a different layout, or showing a placeholder in tests is now trivial — change the destination, the link doesn’t move.
The value type needs to conform to Hashable (for stack identity). Brew already does. Any type you push should.
Programmatic navigation with NavigationPath
Sometimes you need to push from code — after a successful save, after a deep link, from a notification handler. That’s what NavigationPath is for.
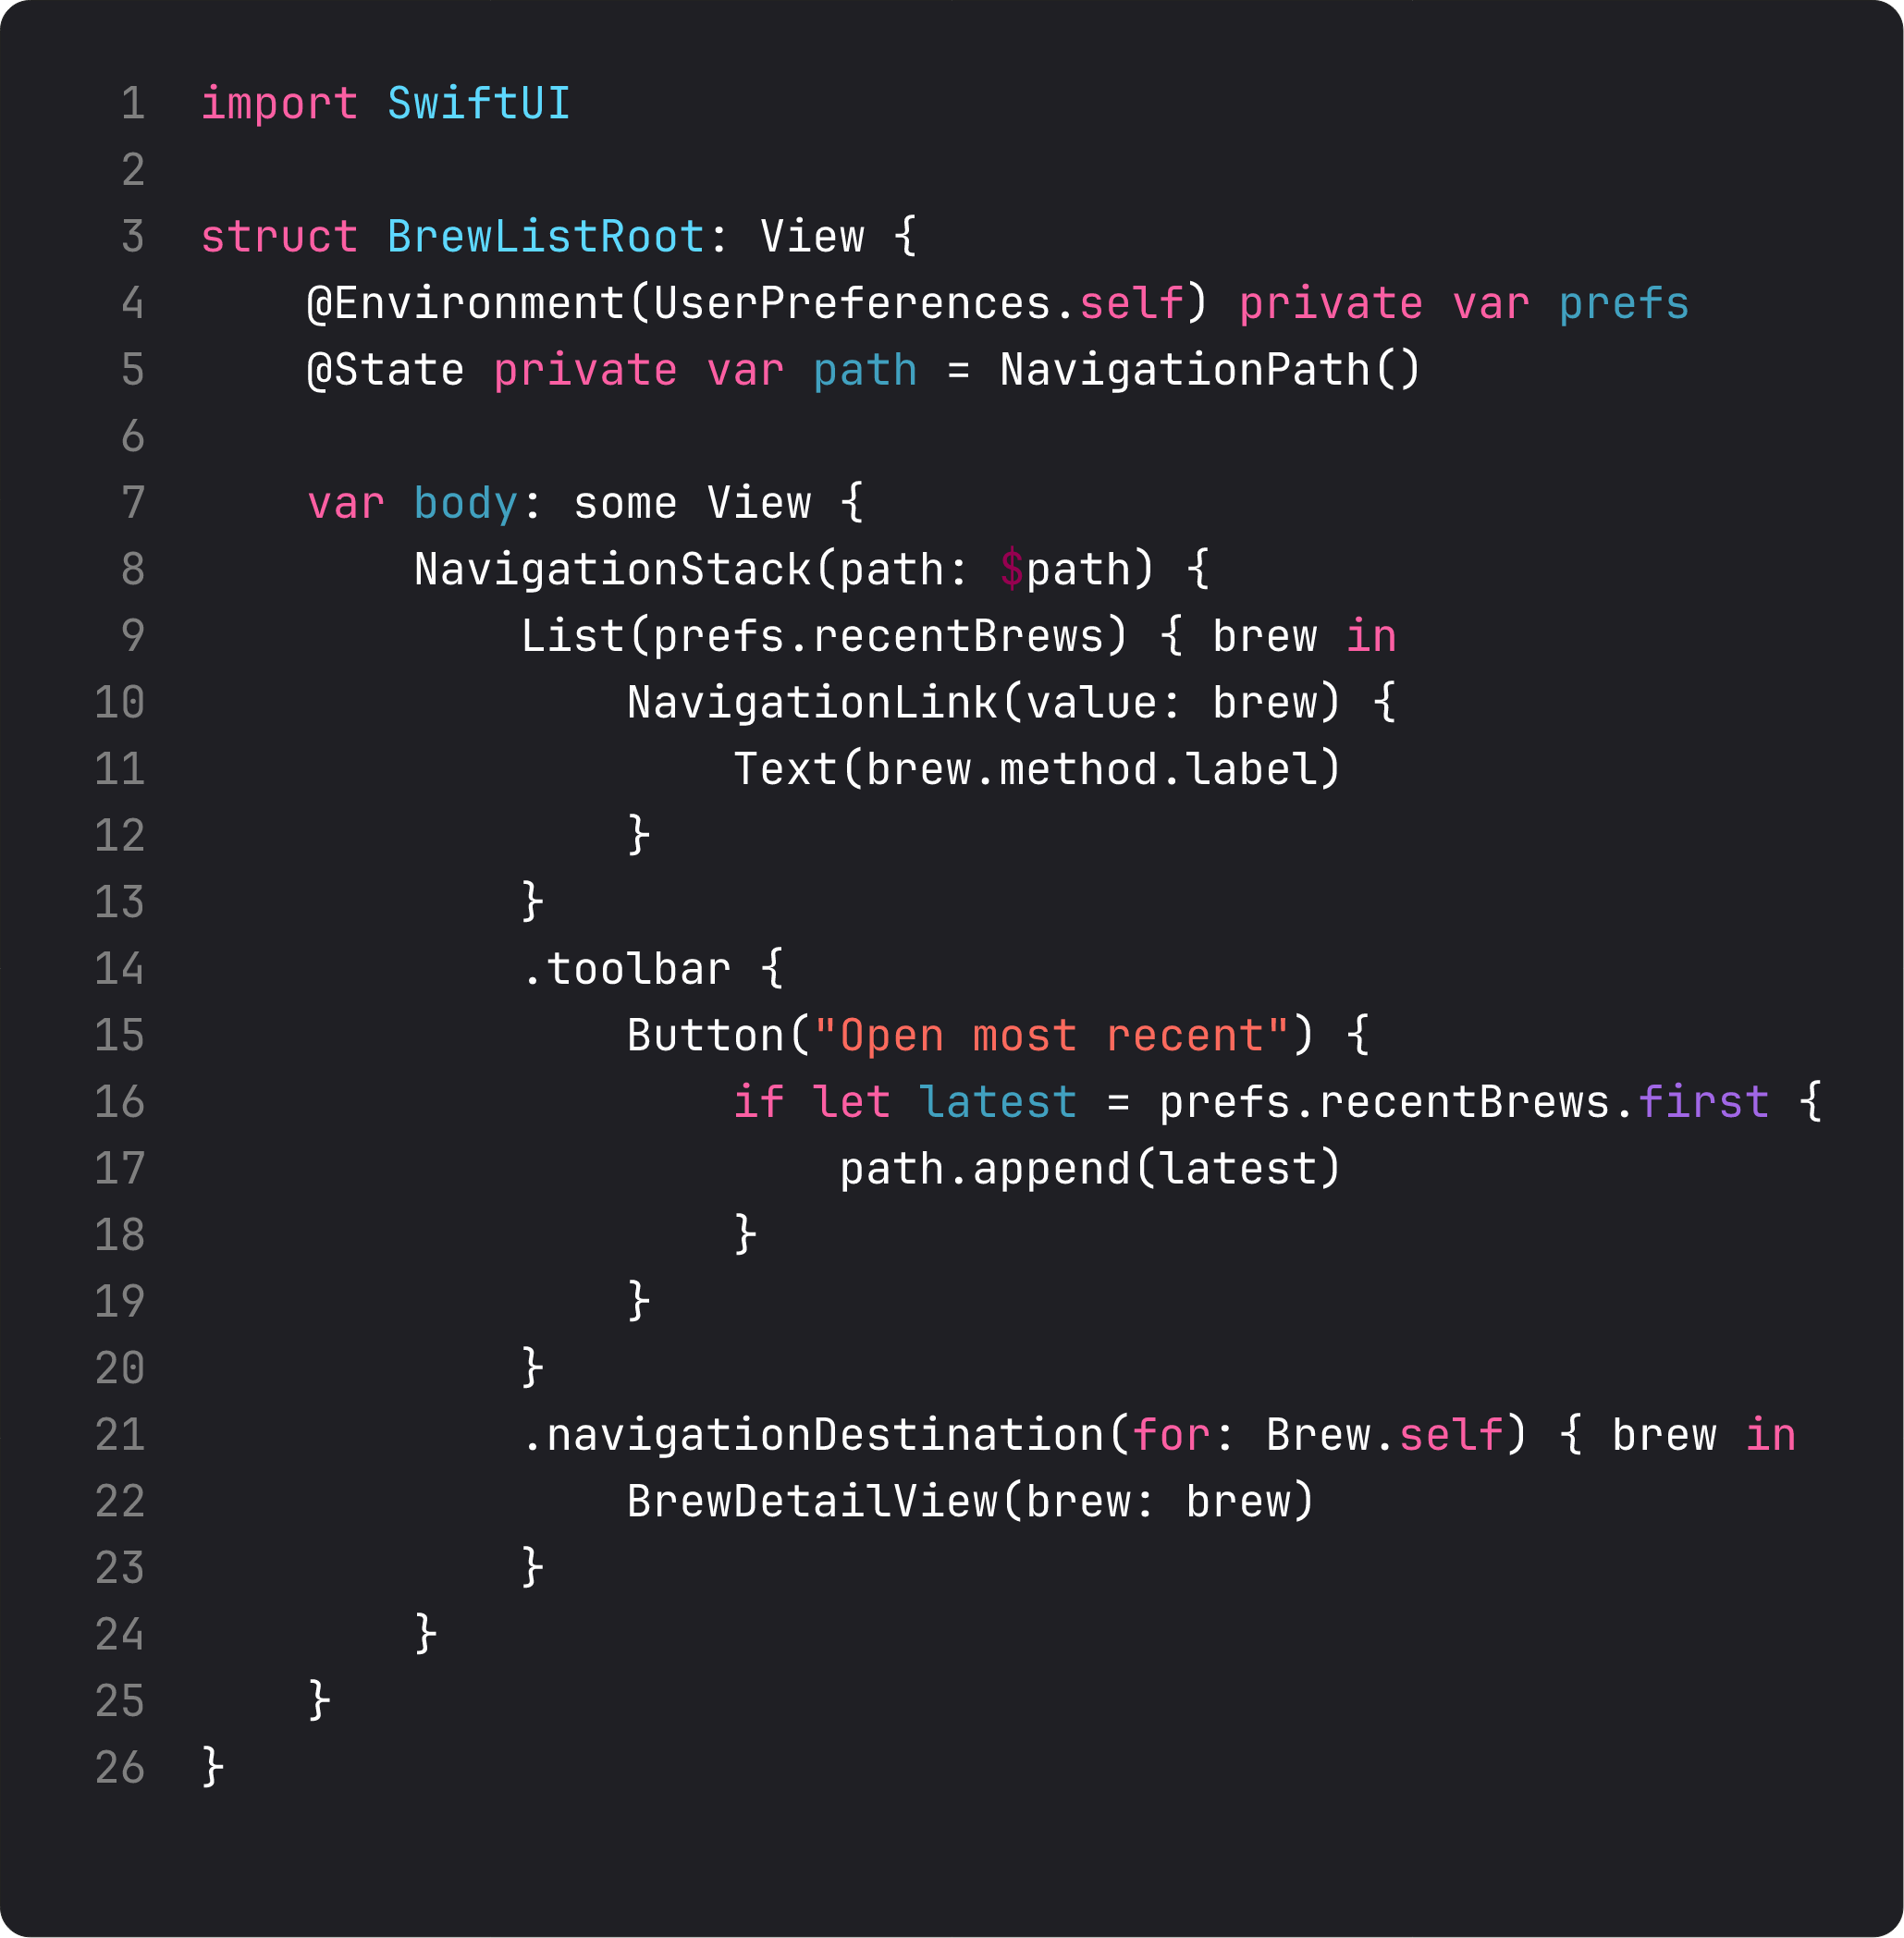
Three operations make up your toolkit:
path.append(brew)— push.path.removeLast()— pop one screen.path = NavigationPath()orpath.removeLast(path.count)— pop to root.
A NavigationPath can hold values of multiple types. SwiftUI matches each value with the right navigationDestination(for:) declaration. This is what makes deep links work cleanly: parse the URL → produce a NavigationPath of typed values → assign. The stack reflects it.
For BrewLog right now, we don’t need programmatic navigation — taps are the only entry point. We’d add @State private var path = NavigationPath() the moment we add deep links from a Share Sheet, a widget tap, or a Notification.
The detail view
Here’s the receiving view. Pure presentational — takes a Brew, renders a hero treatment.
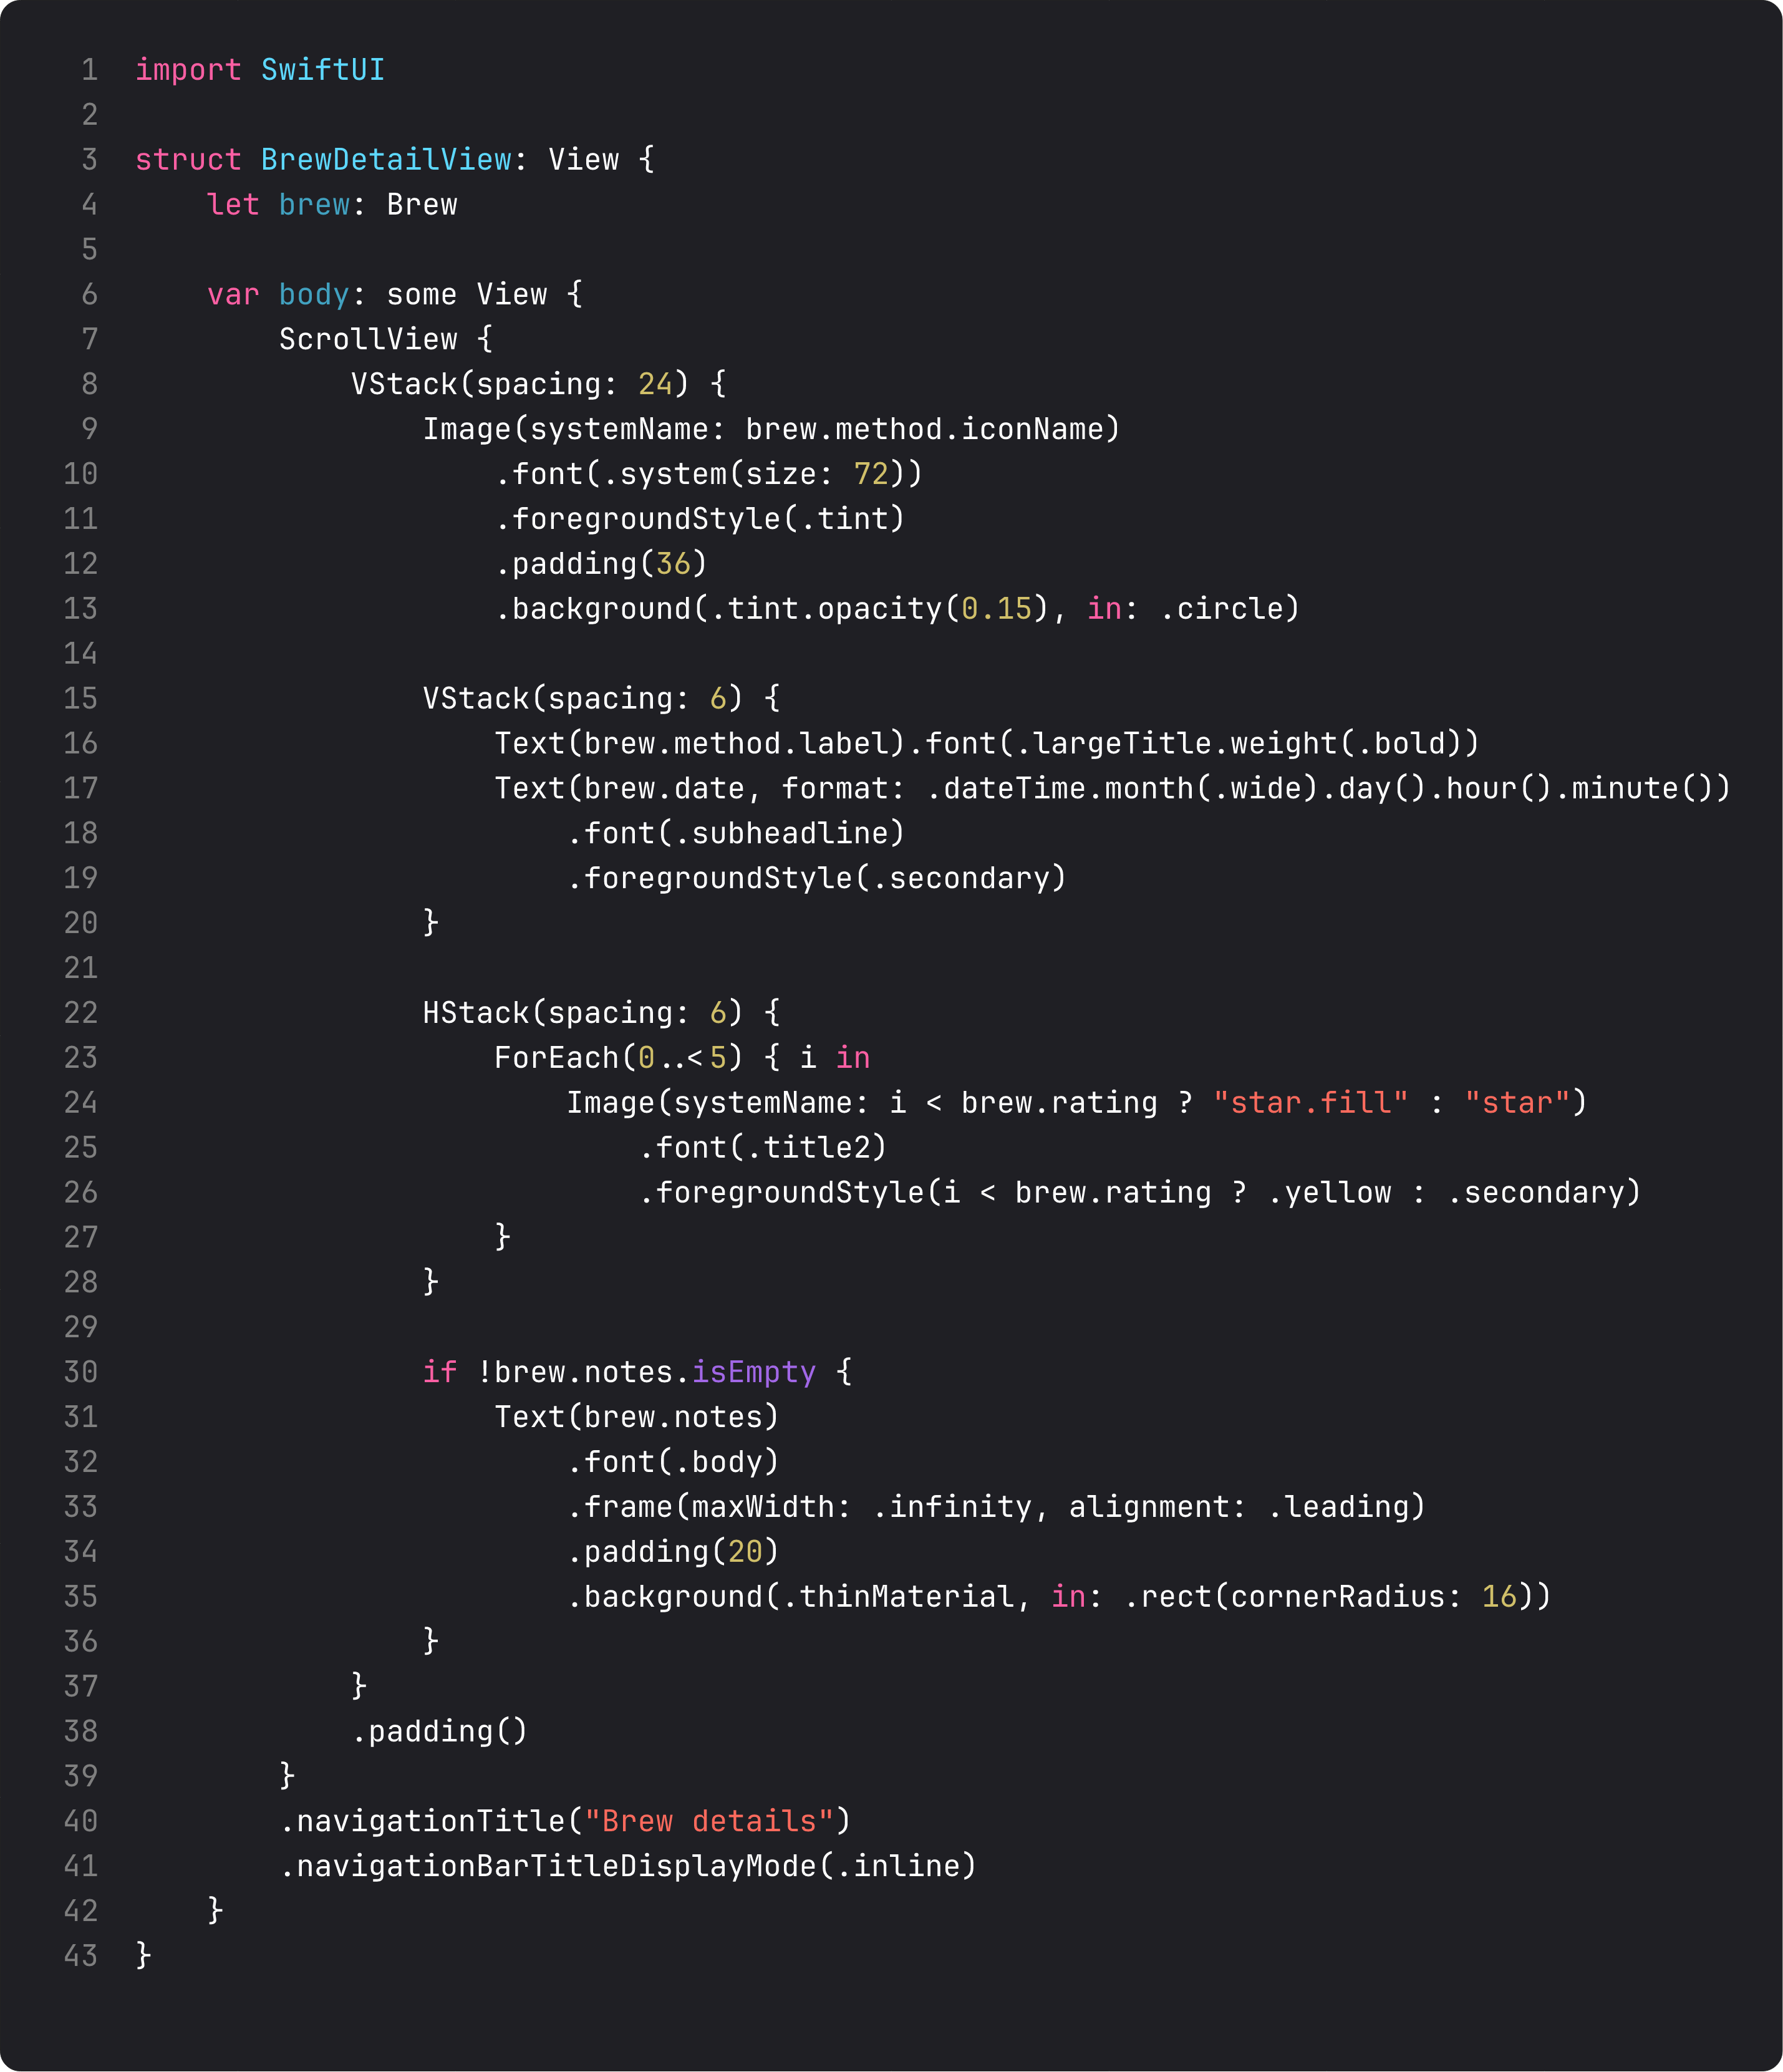
Three deliberate choices:
- Hero icon big and proud — same icon style we built in the home hero, just scaled up. Reusable visual language pays off here.
.navigationTitle("Brew details")with.inlinedisplay mode — small inline title in the nav bar, leaves the whole content area for the actual detail. The system gives us a back button and animation for free.- The detail view doesn’t take
prefsfrom environment — it just receives theBrewvalue. It’s a pure function of input. Easier to preview, test, and reuse. The view that doesn’t need state shouldn’t ask for state. That’s literally the Interface Segregation Principle (ISP) applied to view APIs.
If we needed to delete or edit from this screen, then we’d reach for @Environment(UserPreferences.self). Until then, no.
Sheet vs push — the decision tree
Push (NavigationLink) and Sheet (.sheet(isPresented:)) are the two ways to show a “more screen” in iOS. The wrong choice feels off the moment a user sees it.
Push when:
- The new screen is part of a drill-down hierarchy (list → detail → sub-detail).
- The user might want to swipe back to where they came from.
- The destination is about a specific thing (this brew, this user, this article).
- You want system back navigation with breadcrumbs (the title in the back button).
Sheet when:
- The user is in a modal task (compose, settings, edit).
- The destination is independent of the current context.
- You expect them to complete or cancel before resuming.
- You want a swipe-down to dismiss gesture.
For BrewLog: brew detail is push (it’s about a specific brew, you swipe back). The compose flow is currently inline — when we evolve it to a separate sheet (next lesson), it’ll be a sheet (modal task, swipe-to-dismiss).
A common LLM mistake is to push everything because “navigation = push.” The result is an app where settings is reached by drilling four deep. Use modals for modal things.
What it looks like running
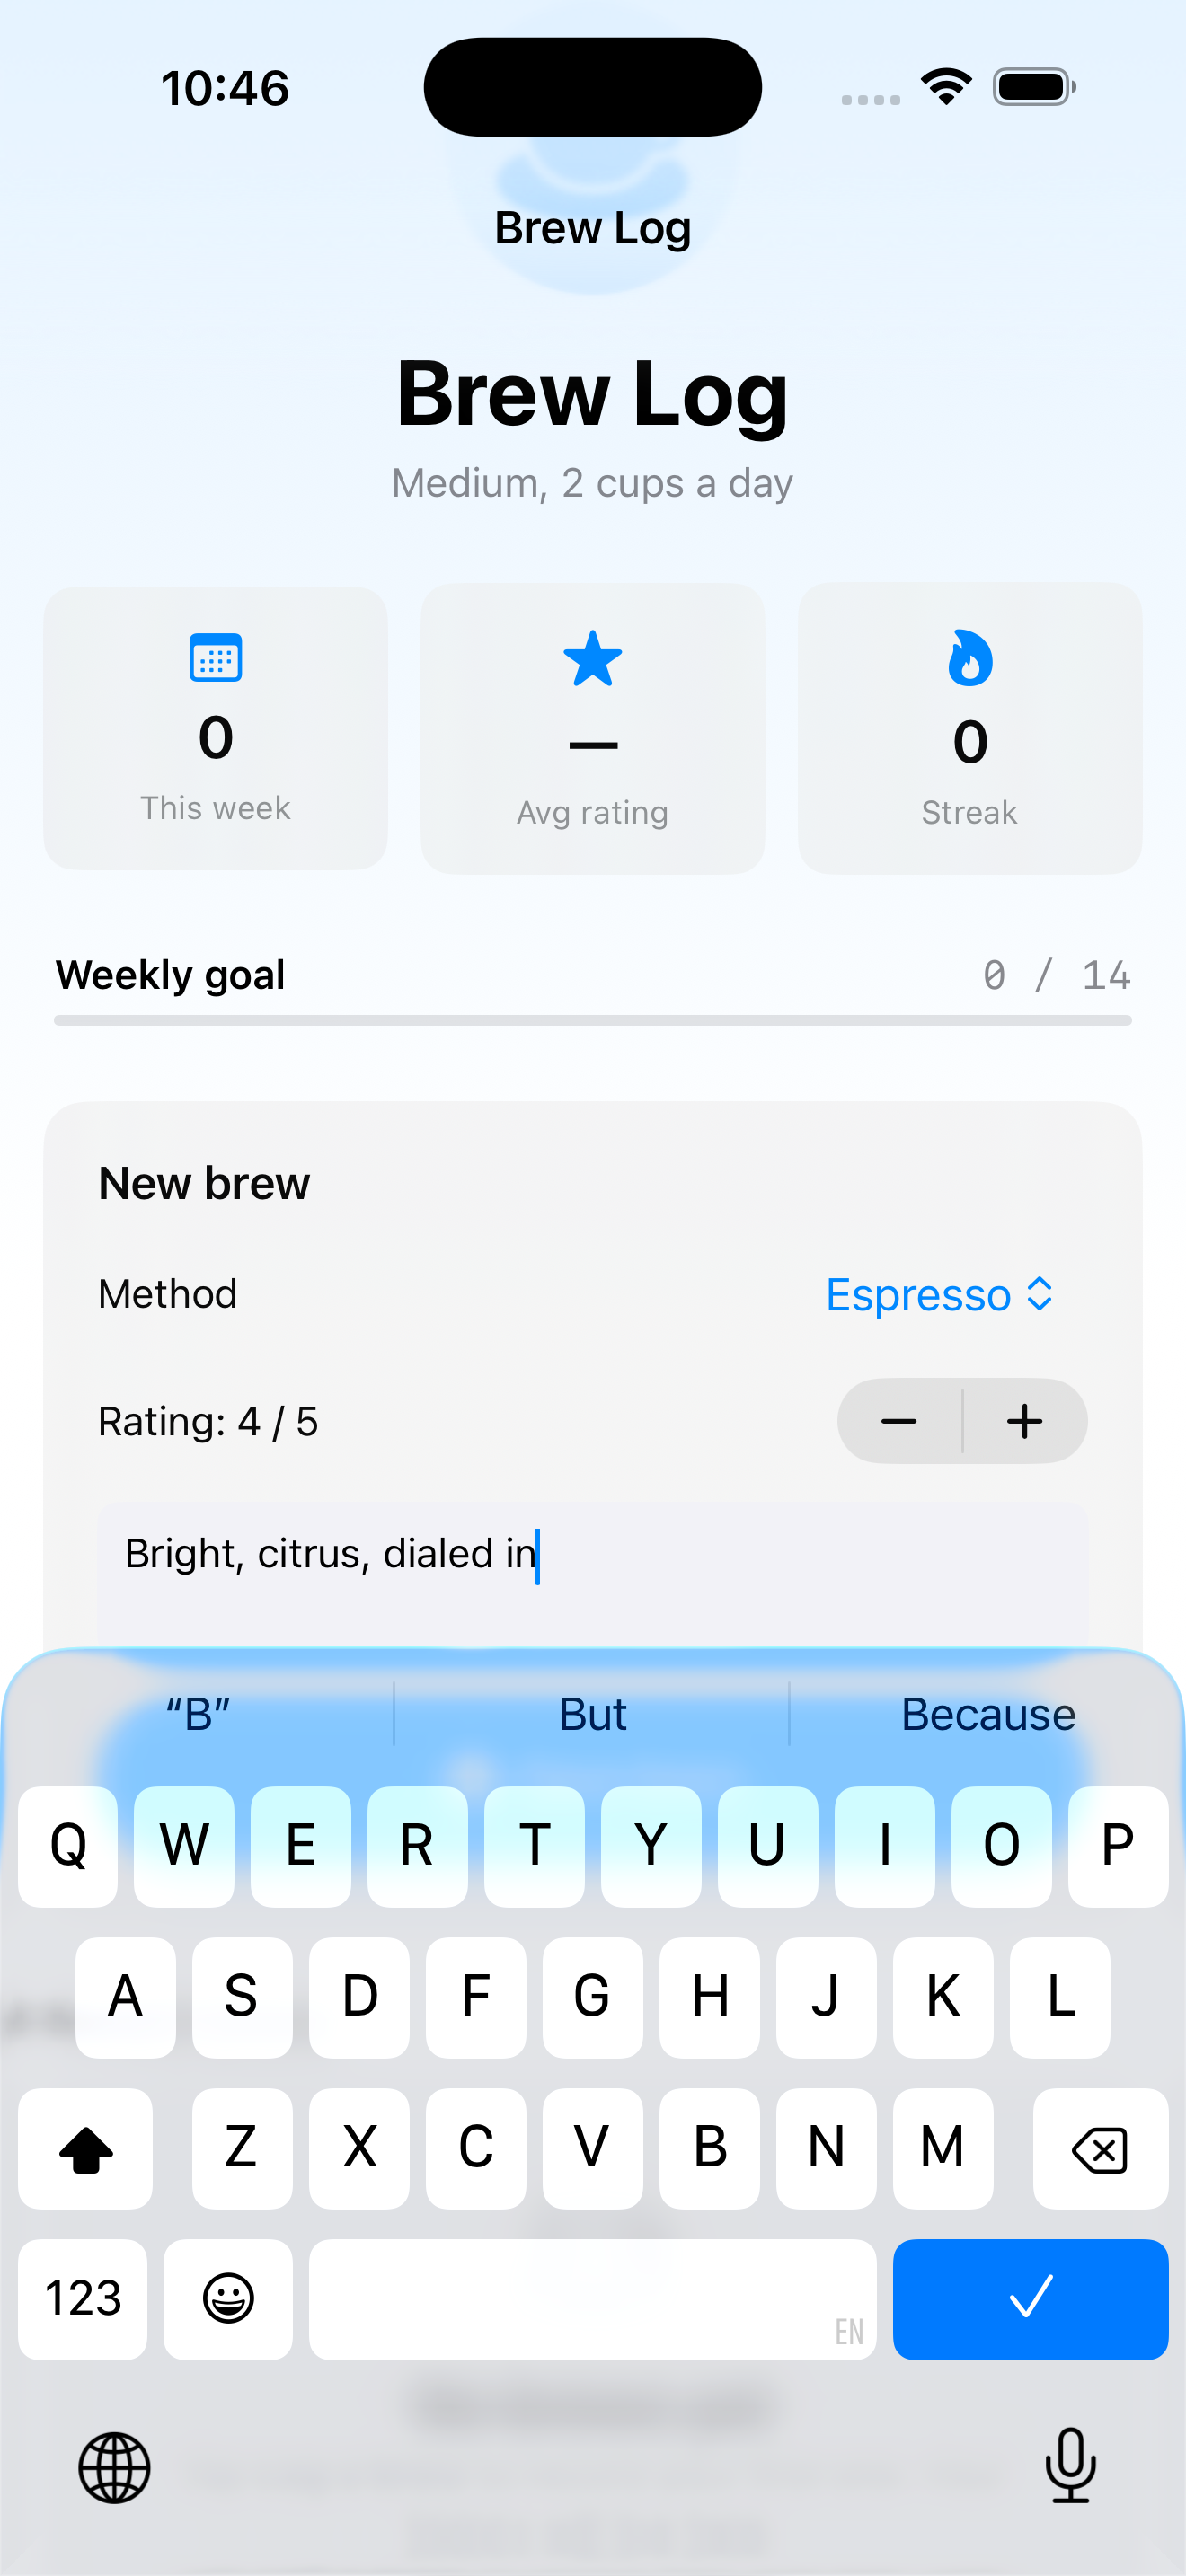
The video composes a brew, scrolls down to recent brews, taps the row → slides into the detail screen with hero icon and notes, taps “Brew Log” → slides back. Familiar behavior, native animations, free.
Notice the small inline “Brew Log” title now sits in the nav bar at the top. We’ll move the overflow menu (the ”…” in the hero) into the toolbar in lesson 16 once we cover .toolbar properly.
Takeaway
NavigationStack + value-based NavigationLink + navigationDestination(for:) is the pattern. Push for hierarchy, sheet for modal tasks. NavigationPath for programmatic pushes when you need them. Detail views should take their data as values, not environment, when they can.
Next lesson: the overlay family — sheets, full-screen covers, popovers, alerts, and confirmation dialogs. We move the BrewLog compose card into a real .sheet with detents.
NativeFirst Team
EditorialThe NativeFirst team — engineers and designers building native Apple apps and writing the courses we wish we had when we started.
Comments
Leave a comment