Forms, TextField, and @FocusState — Real Input
Every iOS app eventually needs the user to type something. SwiftUI’s input toolkit is small but precise: Form for grouped settings, TextField and SecureField for single-line input, TextEditor for long text, and @FocusState to control which field has the keyboard.
The fields look right by default. The interesting part is configuring them — keyboard type, content type, autocapitalization, submit label — so the user gets the exact keyboard they expect. Skip these and your sign-up screen reuses the keyboard from the previous app, complete with autocorrect on email addresses. (Yes, every iOS user has been burned by this. Be the dev who isn’t.)
This lesson adds a real compose card to BrewLog: pick a method, set rating, type free-form notes, hit Save. That replaces the placeholder “Log a brew” button.
Form — the system-styled settings container
Form is the rounded-section, system-styled container you see in every Apple settings screen. Use it as the root of any “settings” or “create / edit” view.
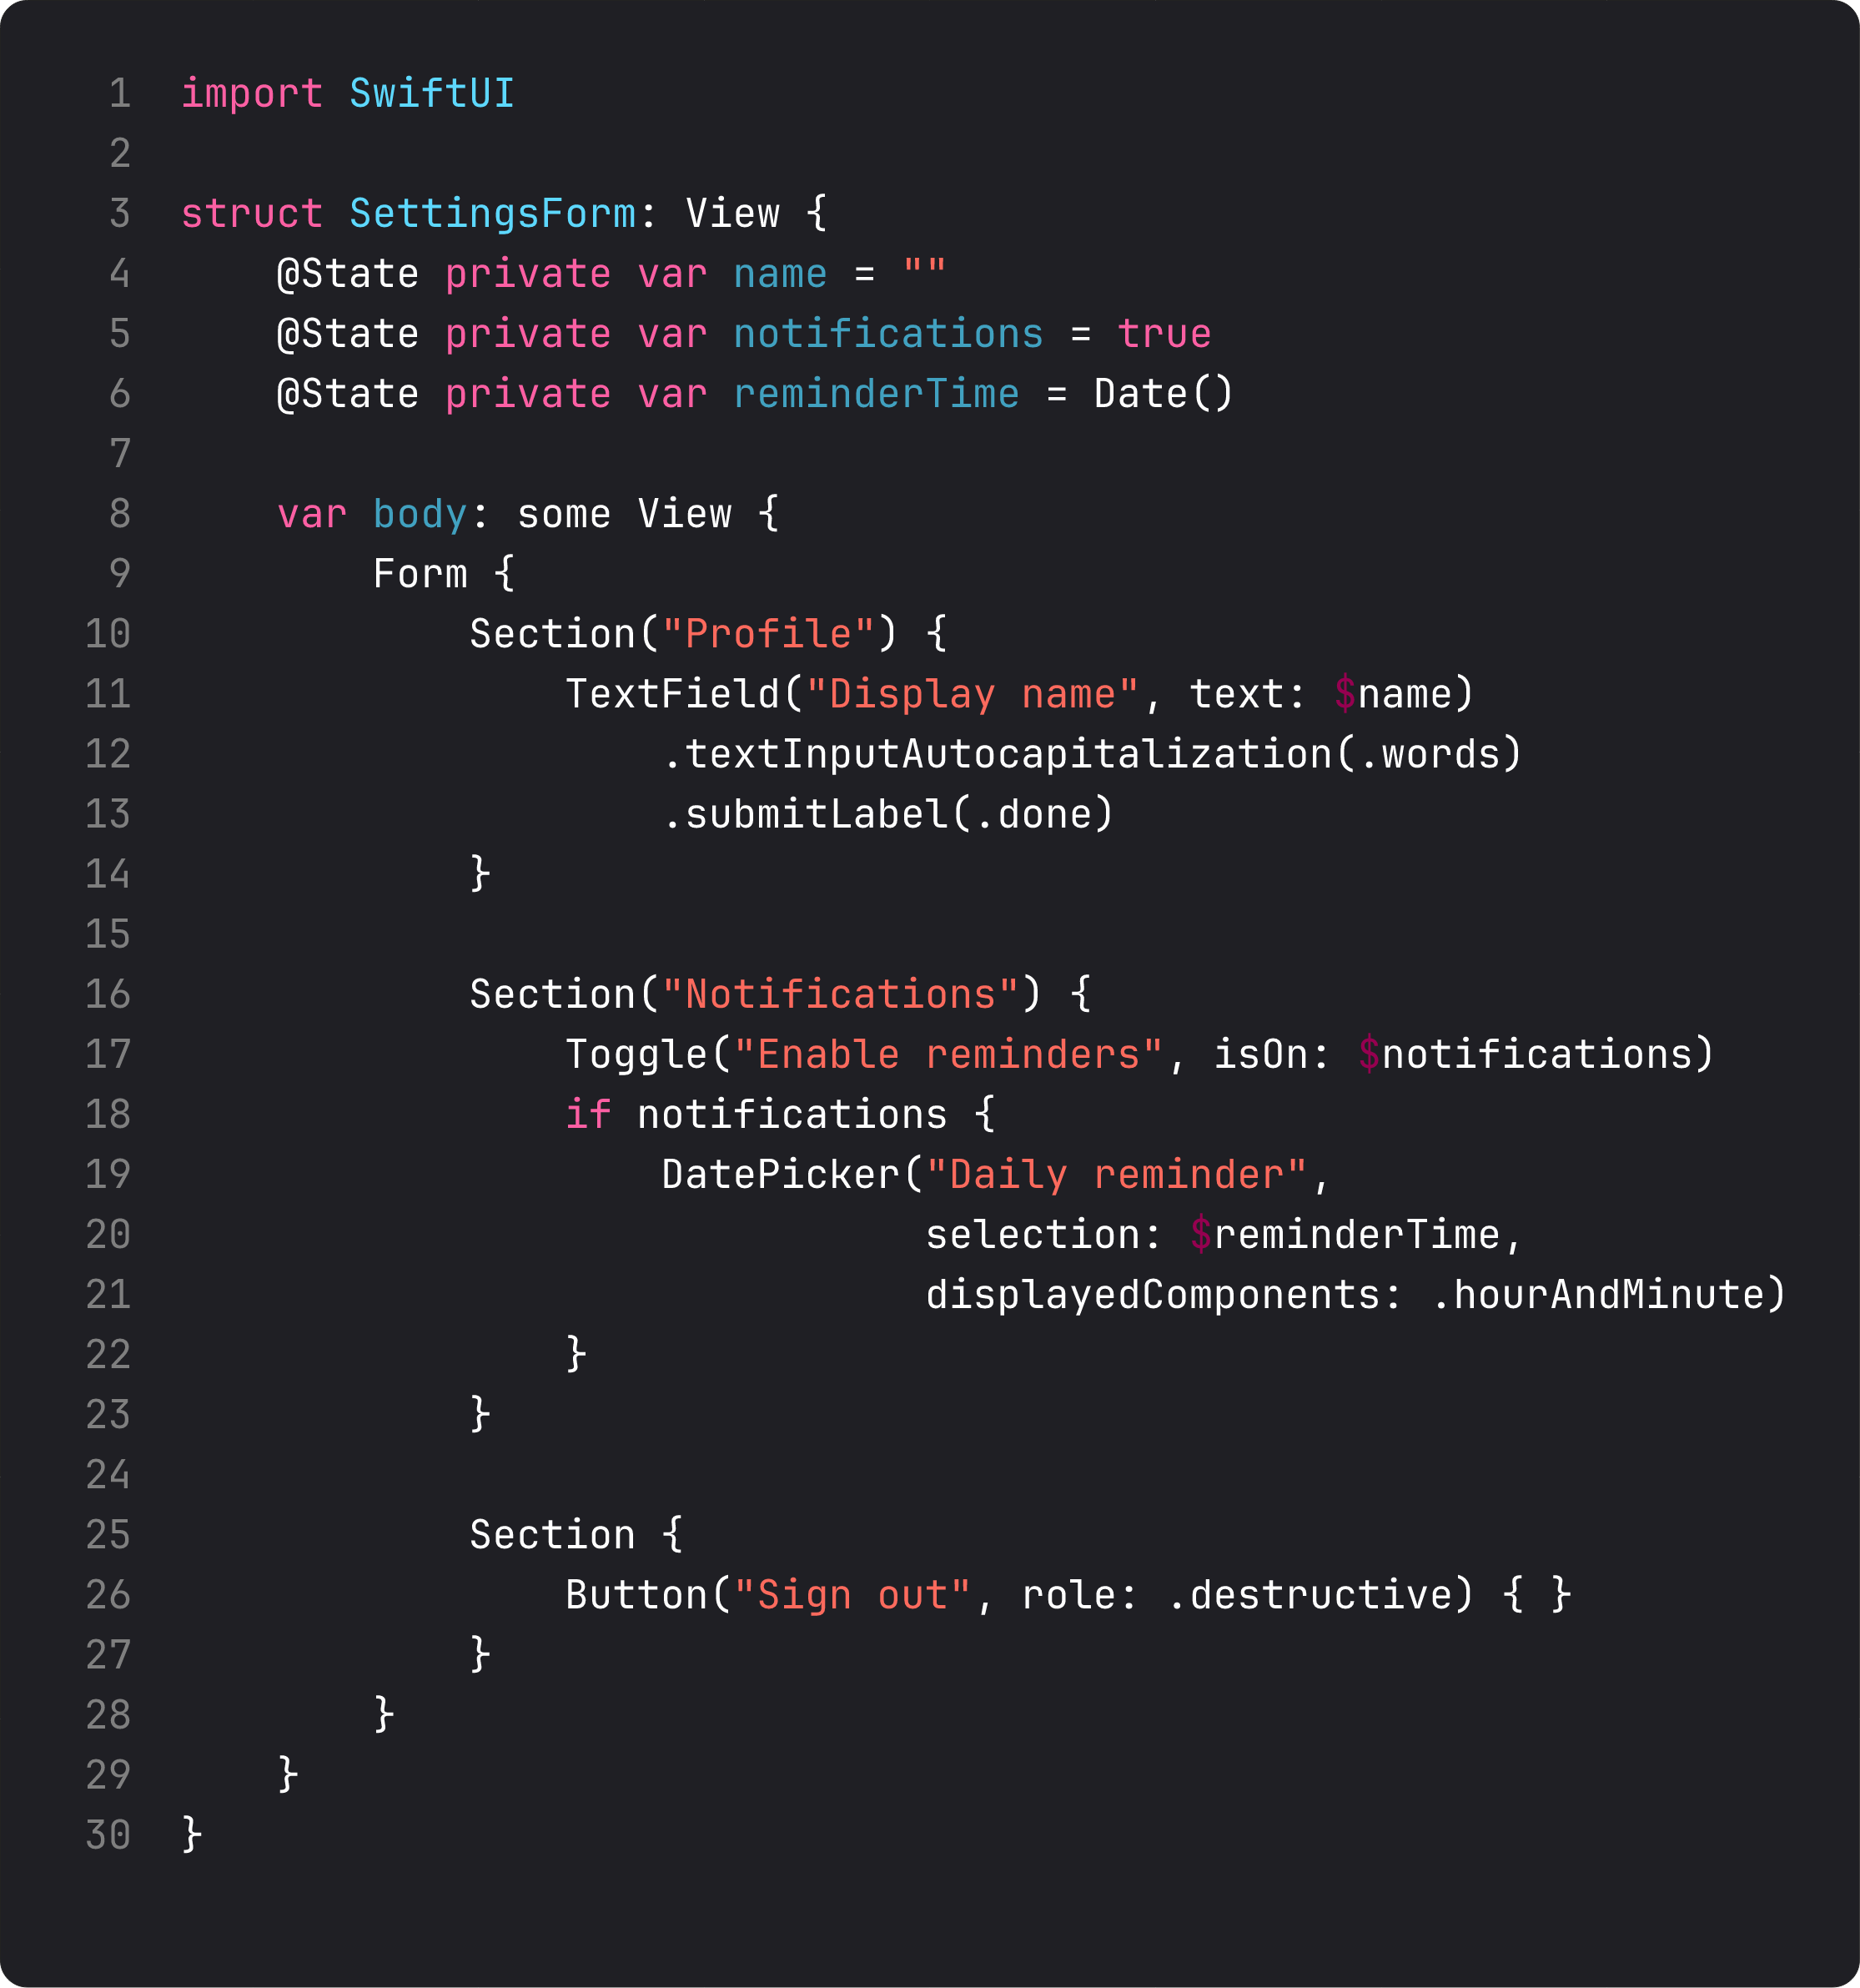
What Form does for you:
- Section grouping with rounded cards — looks identical to system Settings.
- Picker style adaptation — a
Pickerinside aFormautomatically uses.menustyle (compact dropdown) without you specifying. Same Picker outside a Form would look different. - Conditional rows — wrap a row in
if isEnabled { Toggle(...) }and the row appears/disappears with the right animation. - Inline destructive sections — a single
Button(role: .destructive)in its own Section is the standard “Sign out” / “Delete account” pattern.
A note on placement: Form brings its own scrolling. Don’t put it inside a ScrollView — same trap as List. For BrewLog, where the home screen is already a ScrollView, our compose card uses VStack styled to look form-like instead of Form itself. We’d reach for Form when we add a dedicated Settings screen later.
TextField — type the user a real keyboard
TextField looks innocent — string in, binding out. The difference between a sloppy field and a polished one is the modifiers around it.
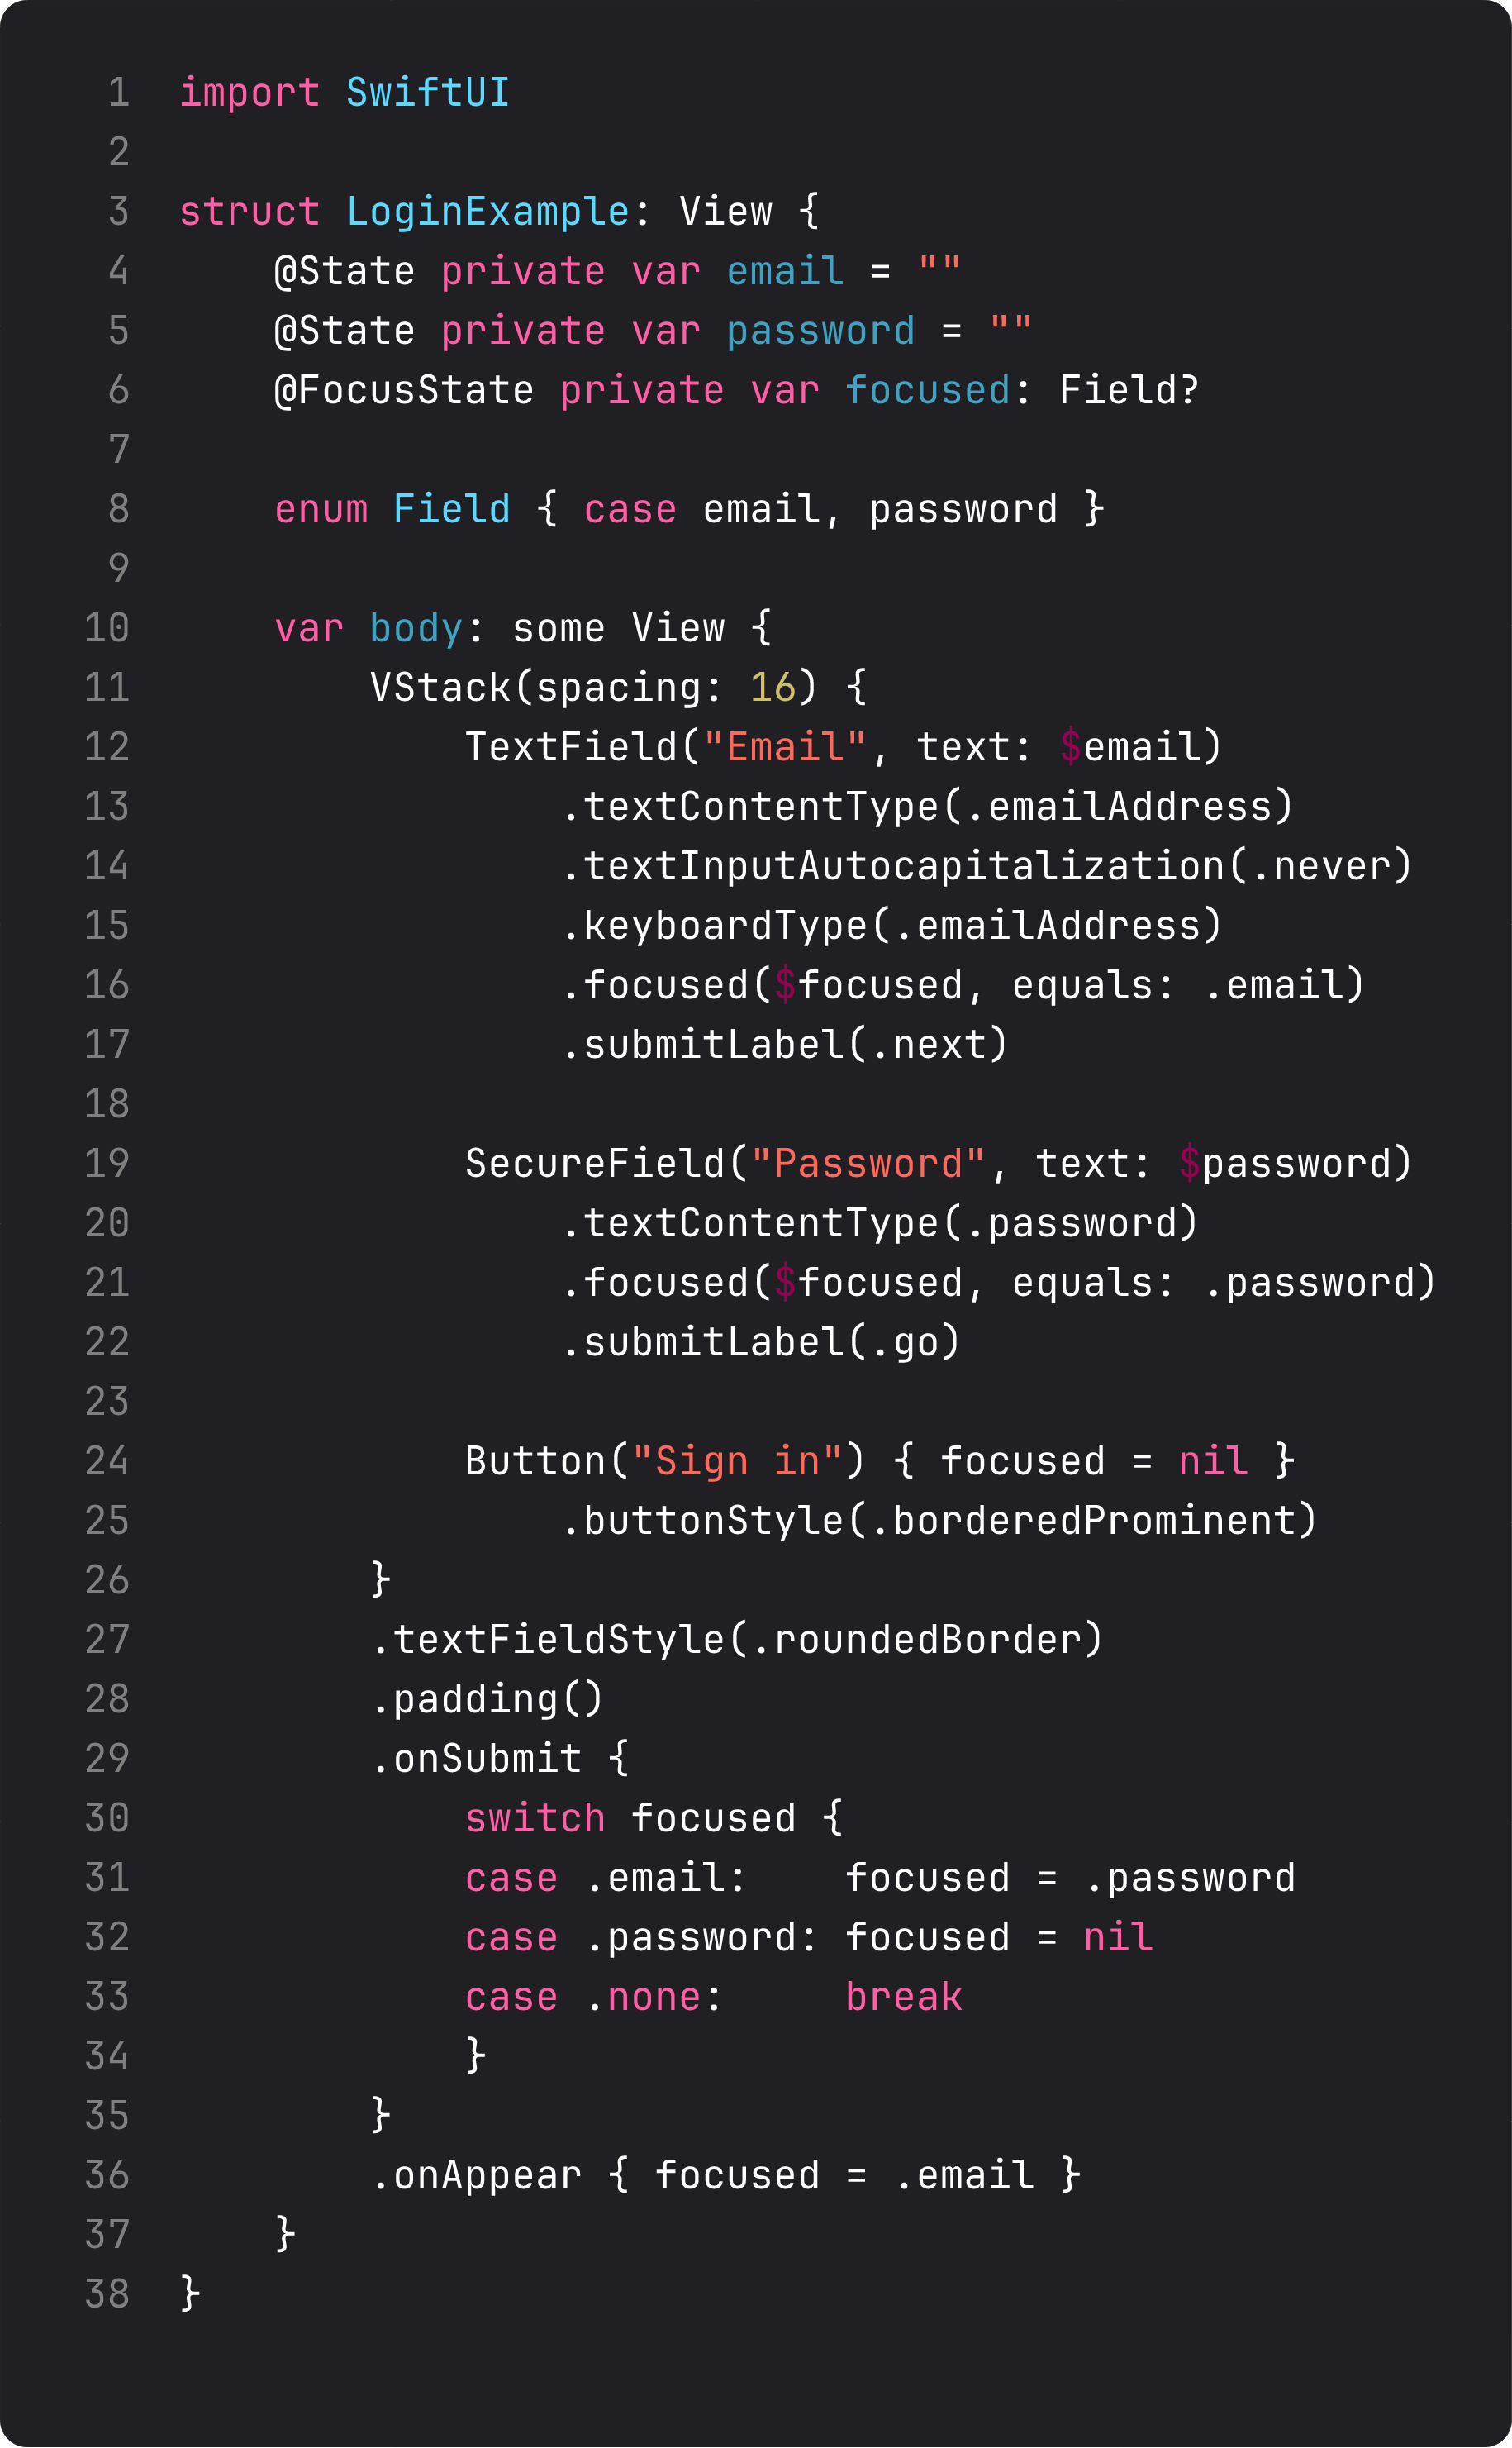
The modifiers that actually matter, ordered by impact:
.textContentType(.emailAddress)— tells iOS what’s being typed. Enables autofill (saved emails, password manager). The single highest-leverage modifier on a TextField..keyboardType(.emailAddress)— picks the right keyboard layout..numberPad,.phonePad,.URL,.emailAddresscover most cases..textInputAutocapitalization(.never)— disables auto-capitalization. Critical for emails, passwords, usernames. The user does not want their email to start with a capital letter..submitLabel(.next)— changes the keyboard’s “return” key to “Next” (or “Go”, “Done”, “Send”). Use with.onSubmitto advance focus through fields.SecureFieldinstead ofTextFieldfor passwords. Looks identical with bullets. Pair with.textContentType(.password)for password manager autofill.
The @FocusState pattern in the snippet is the canonical “tab through fields” form: bind every field to a different case of an enum, then advance with onSubmit. Apple’s own apps work exactly this way.
A real-life moment: if you’ve ever typed an email into a sign-up form on iOS and watched it get autocapitalized to “Mario@Gmail.Com,” that’s a missing .textInputAutocapitalization(.never). Be the dev who fixes that for users.
The new BrewLog compose card
Here’s the actual compose card we wired into BrewLog this lesson. It’s not a Form — it’s a styled VStack because we live inside a ScrollView. But every input idea applies.
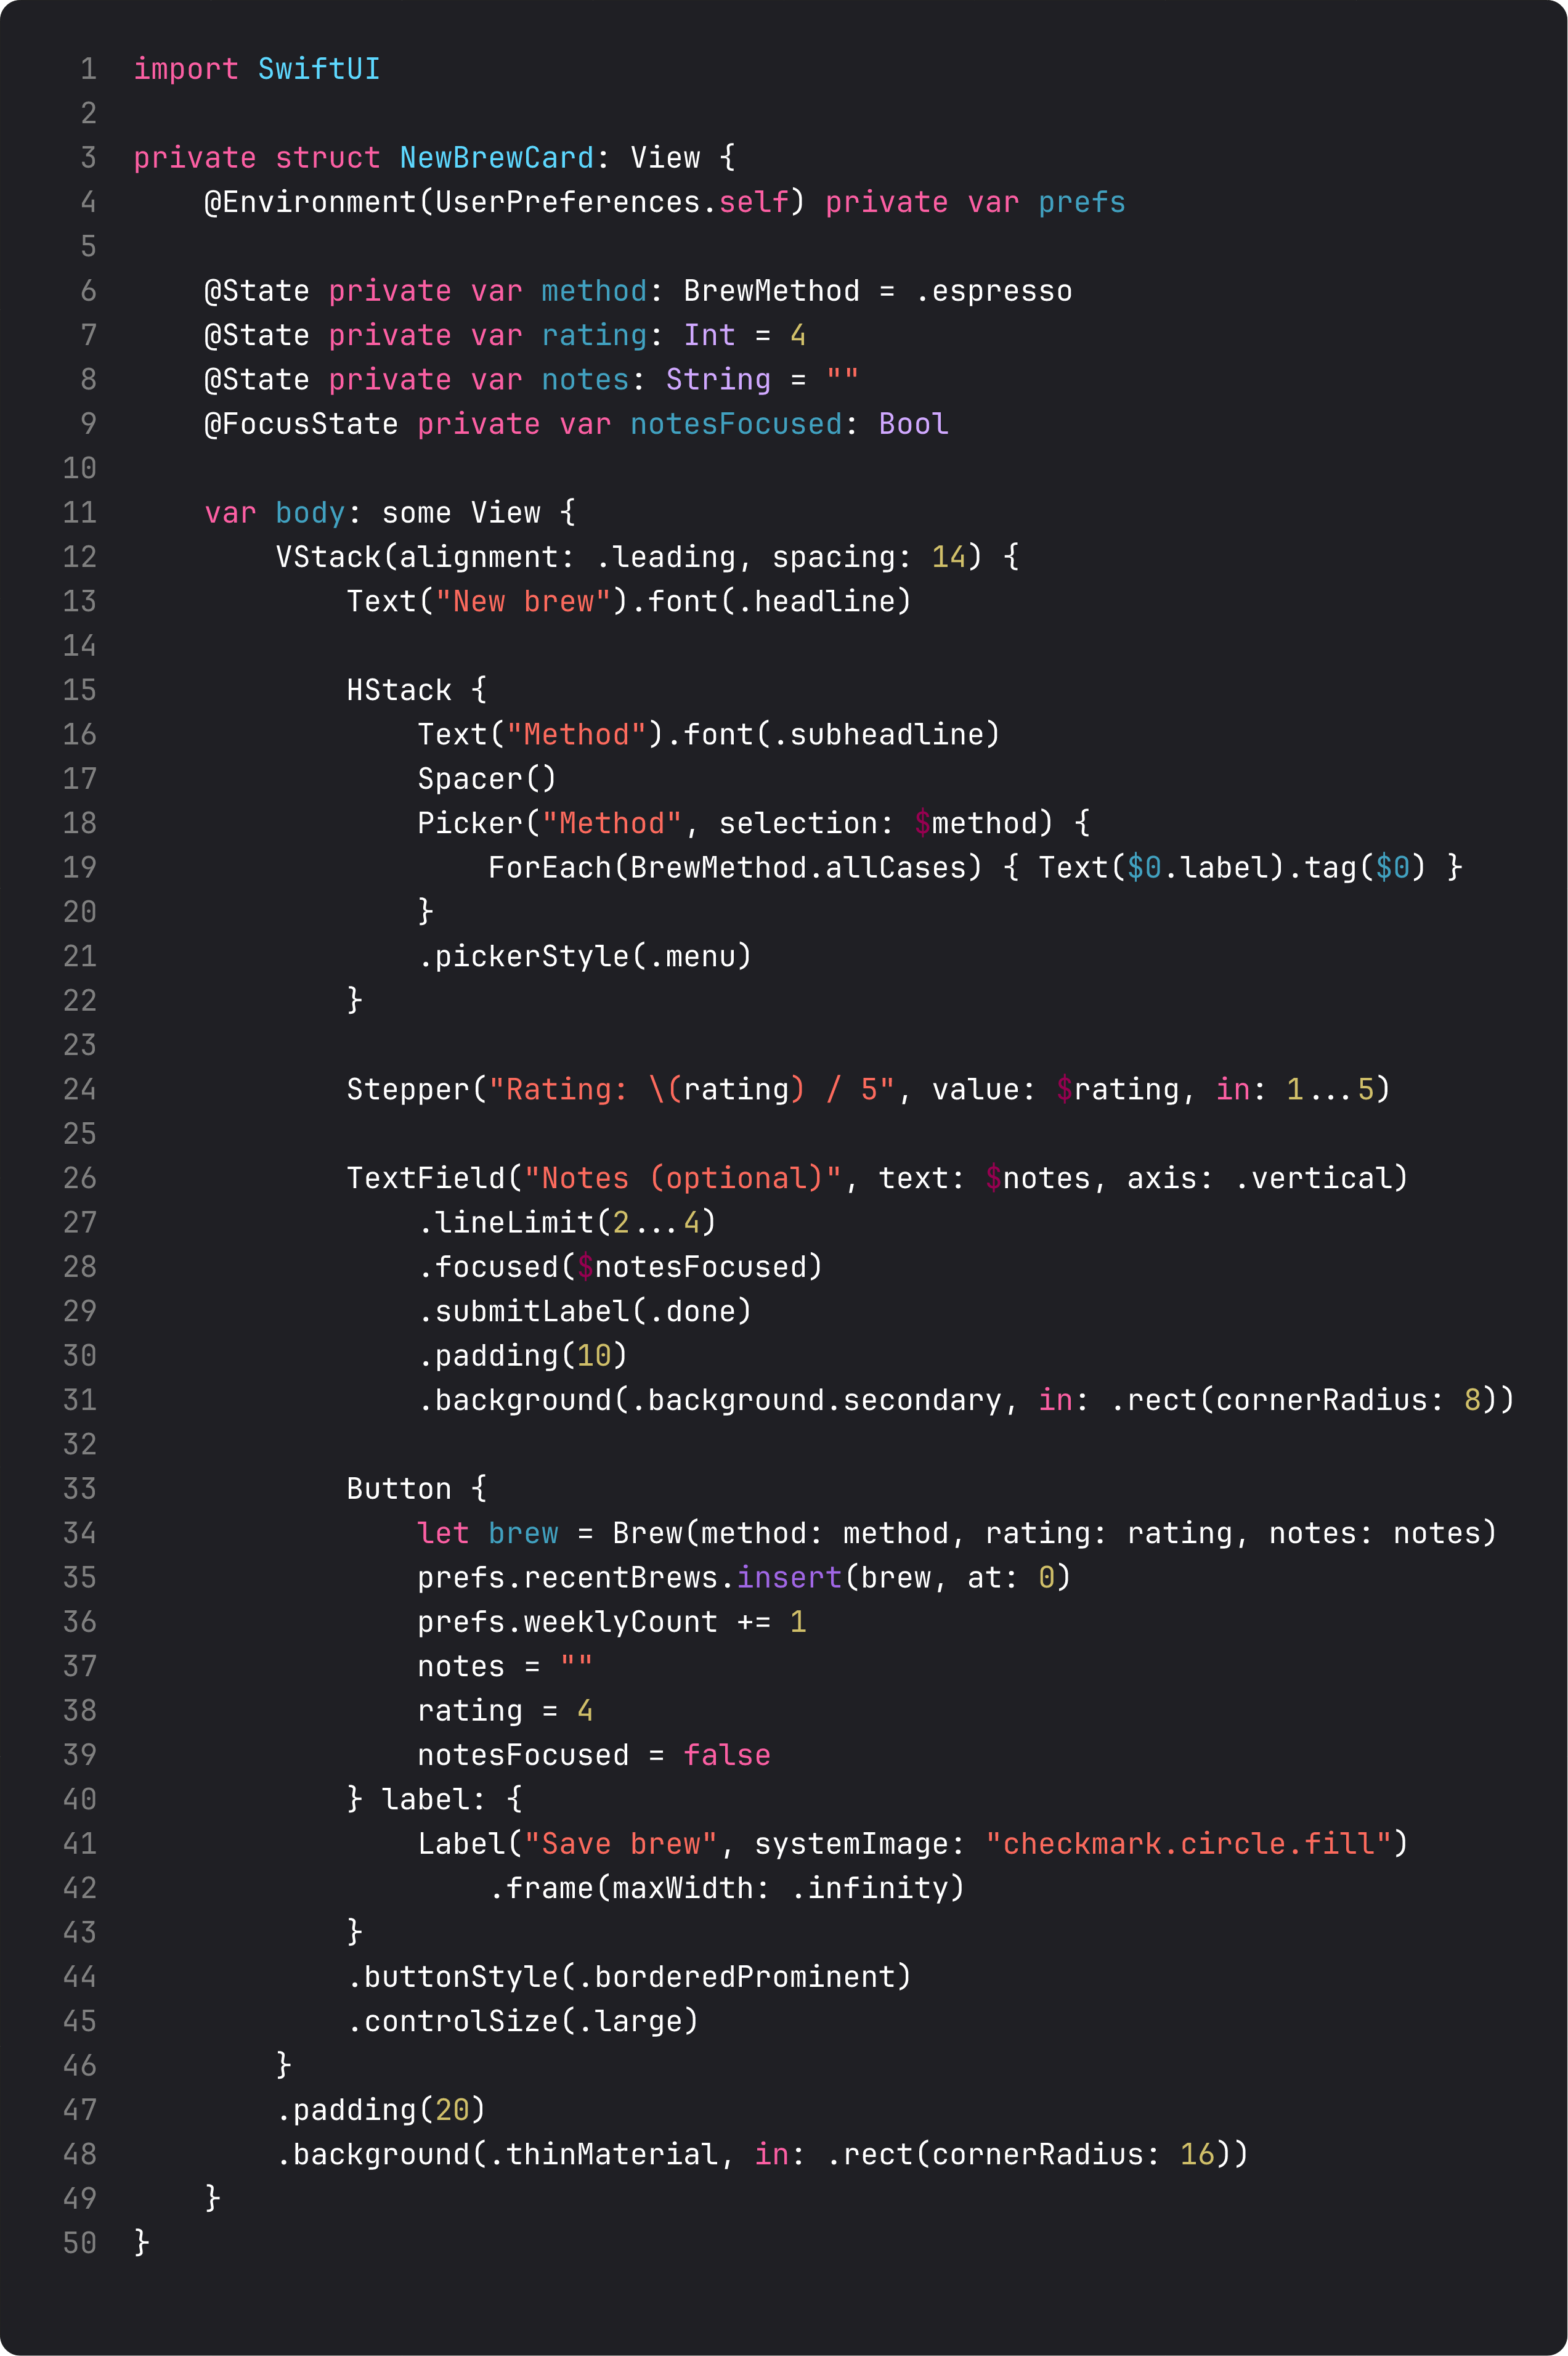
Three input choices worth calling out:
TextField("Notes (optional)", text: $notes, axis: .vertical)— theaxis: .verticalparameter turns a single-line TextField into a multi-line one. The keyboard’s return key now adds a newline (it would dismiss in the horizontal default). For longer-form input,TextEditoris the alternative — but TextField with vertical axis covers 90% of “few sentences of notes” cases without TextEditor’s quirks..lineLimit(2...4)— minimum 2 lines visible, max 4 before scrolling kicks in. Lets the field grow naturally with content..focused($notesFocused)+.submitLabel(.done)— when the user taps Done on the keyboard, the field loses focus and the keyboard dismisses. Without@FocusStateyou can’t programmatically dismiss the keyboard from a non-system event (e.g., the Save button). That’s the pattern we use to dismiss the keyboard when Save is pressed.
The Save button creates a new Brew from the current form state and pushes it onto prefs.recentBrews, then resets. All wired through environment — no parameters, no callbacks. The card just trusts that UserPreferences is reachable.
A trap I see weekly: missing content types
The classic vibe-coded sign-up form:
TextField("Email", text: $email)
    .textFieldStyle(.roundedBorder)

SecureField("Password", text: $password)
    .textFieldStyle(.roundedBorder)
This compiles. Looks fine. Will frustrate a real user within 5 seconds. What’s missing:
- No
.textContentType(.emailAddress)— autofill can’t suggest saved emails. The user types it manually every time. - No
.textInputAutocapitalization(.never)on email — first character gets capitalized. - No
.keyboardType(.emailAddress)— user gets full alphabet keyboard with no@shortcut. - No
.textContentType(.password)on password field — password manager doesn’t offer to autofill or save. - No
@FocusState— tapping Return on the keyboard does nothing instead of advancing to password.
The fix is six lines of modifiers. The before-and-after is the difference between “I’ll put up with this” and “I love this app.” Inputs are where polish compounds the fastest. It’s also where SOLID’s Open/Closed has nothing to say — the modifiers are linear. Just learn them and reach for them every time.
What it looks like running
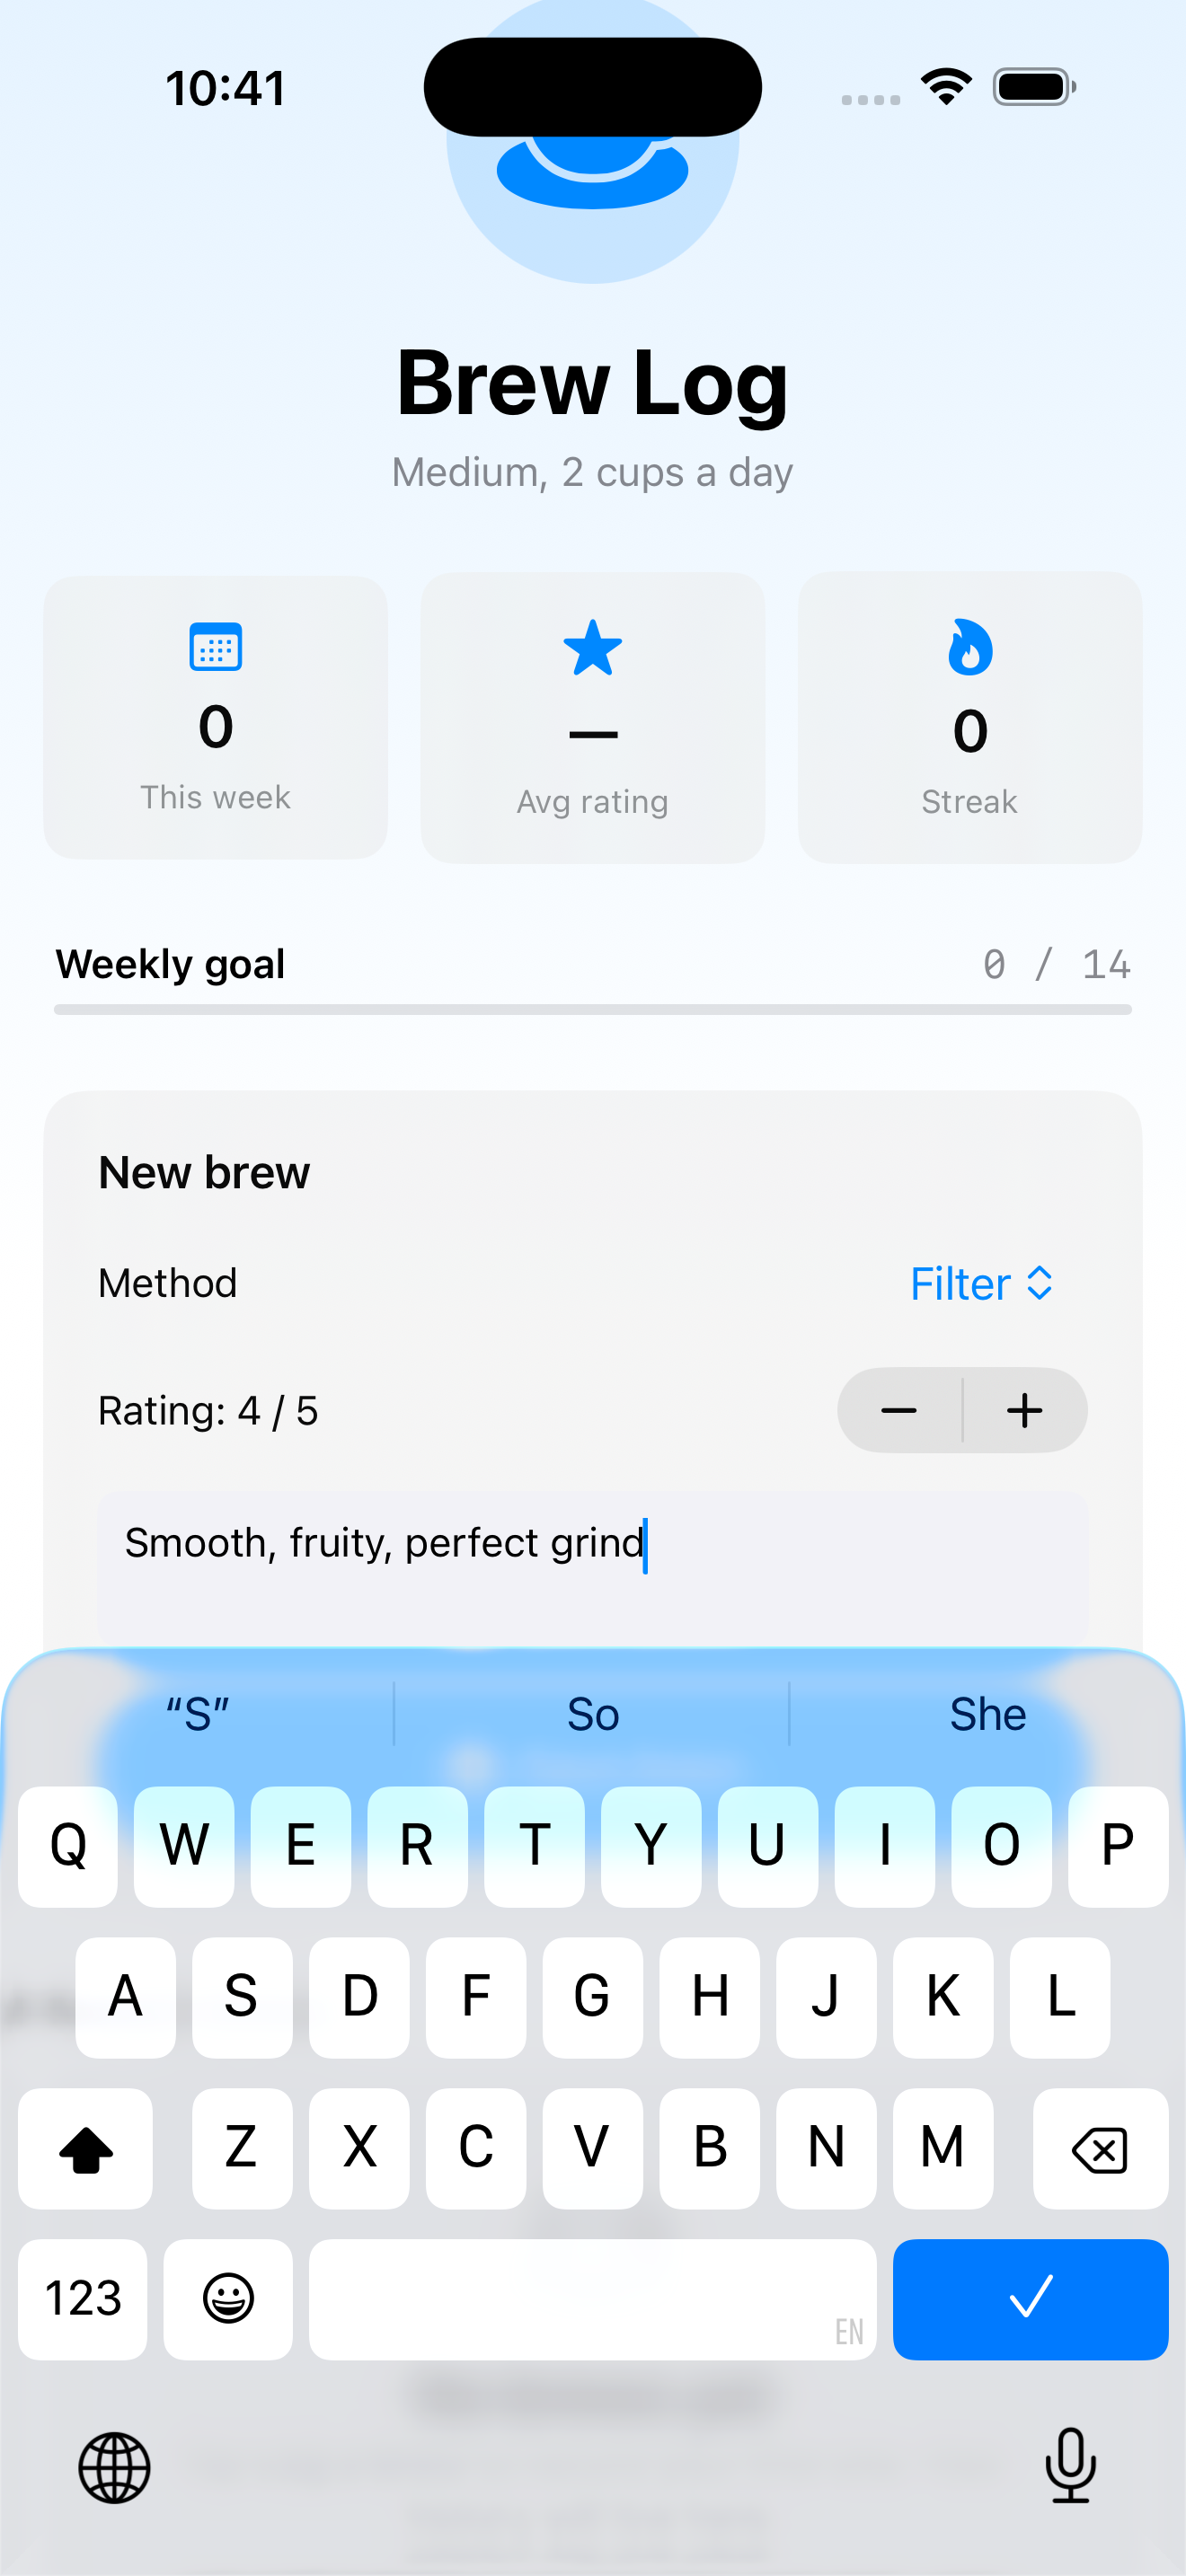
The video walks through one compose: switch method to Filter via the Picker, type a notes string into the TextField (system keyboard appears, multi-line layout grows), dismiss the keyboard, tap Save. The brew appears at the top of the recent list with method, relative date, and 4-star rating.
This is also the moment BrewLog crosses from “demo” into “small but actually useful.” From here on, every lesson polishes what we’ve already built rather than introducing new structural pieces.
Takeaway
Form is your settings container. TextField is most input. SecureField for passwords. TextEditor for very long text. @FocusState for keyboard control. The modifier stack — textContentType, keyboardType, textInputAutocapitalization, submitLabel — is what separates polished apps from rough ones. Configure every field, every time.
Next lesson: NavigationStack. We split BrewLog’s home into a real navigated app — push from a brew row to a detail screen, programmatic deep links, and the sheet-vs-push decision tree.
NativeFirst Team
EditorialThe NativeFirst team — engineers and designers building native Apple apps and writing the courses we wish we had when we started.
Comments
Leave a comment