@State and @Binding — Owning vs Borrowing Mutable Data
Here’s the SwiftUI fact that changes everything once it clicks: a view doesn’t store its mutable data the way a UIKit UIViewController does. Views are values — they’re recreated constantly. So if a view needs to remember something between body re-renders, it has to ask the framework to store that something on its behalf.
That’s what @State is. And once you have state, you’ll inevitably want to share it with a child view. That’s @Binding.
This lesson is the data-flow rule that the rest of SwiftUI is built on. We’ll wire up three controls — Toggle, Slider, Stepper — to a Preferences card in BrewLog, and you’ll see the whole pattern in action.
@State — owned mutable data
The classic counter example, because it’s still the cleanest demo:
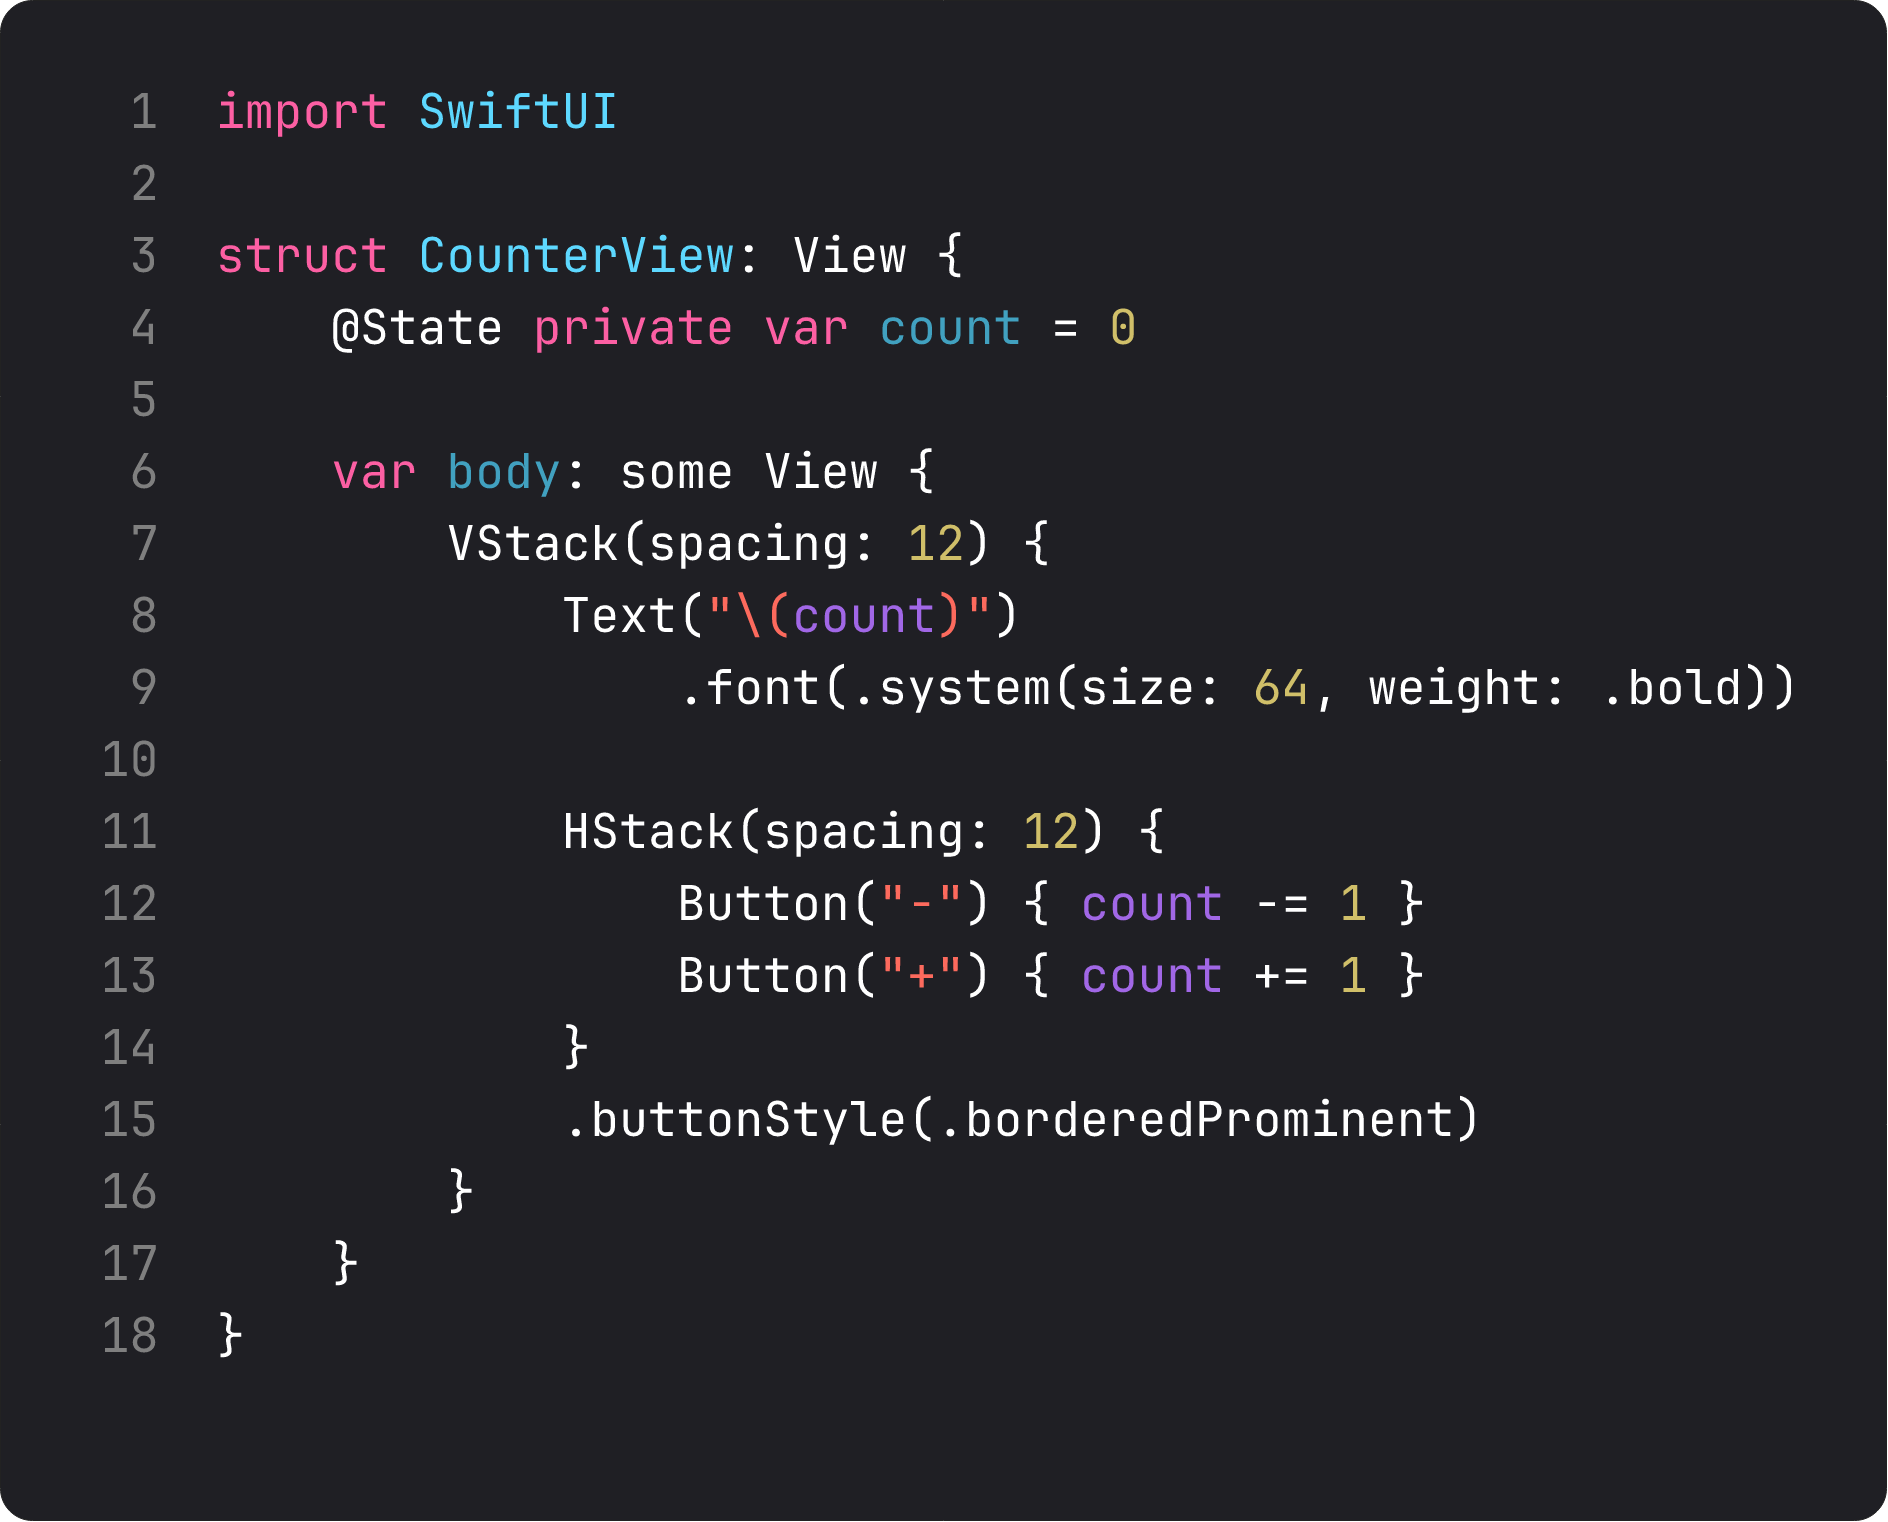
@State private var count = 0 is a property wrapper. Behind it, SwiftUI is doing two things:
- Storing the value off-view — somewhere in the framework’s internal storage, keyed to this view’s identity. So when the struct is recreated (which happens on every state change), the value persists.
- Tracking dependency — when
bodyreadscount, SwiftUI notes “this body depends on this storage location.” Whencountchanges, SwiftUI invalidates and re-evaluatesbody. Only the views that actually read the changed value get re-rendered.
Two rules that catch everyone in week one:
- Always
private. State is owned by this view. If you find yourself wanting to share it, you don’t needinternalaccess — you need@Binding. - Always initialize with a default value.
@Stateis for values the view itself owns and provides initial values for. If the value should come from outside, that’s@Binding.
Real-life analogy: @State is like the volume knob on your speaker. The speaker owns it. You turn it. When the volume changes, every part of the speaker that depends on it (the LED display, the actual amplifier) updates. Nobody else has authority to set the volume.
@Binding — borrowed mutable data
The moment you extract a sub-view, you have a problem. The sub-view needs to read and write the parent’s state. You don’t want to pass the value (it would copy, since structs), and you can’t pass @State (it doesn’t make sense to “own” something that’s already owned).
The answer is @Binding. A binding is a two-way reference — read and write — to a value owned somewhere else.
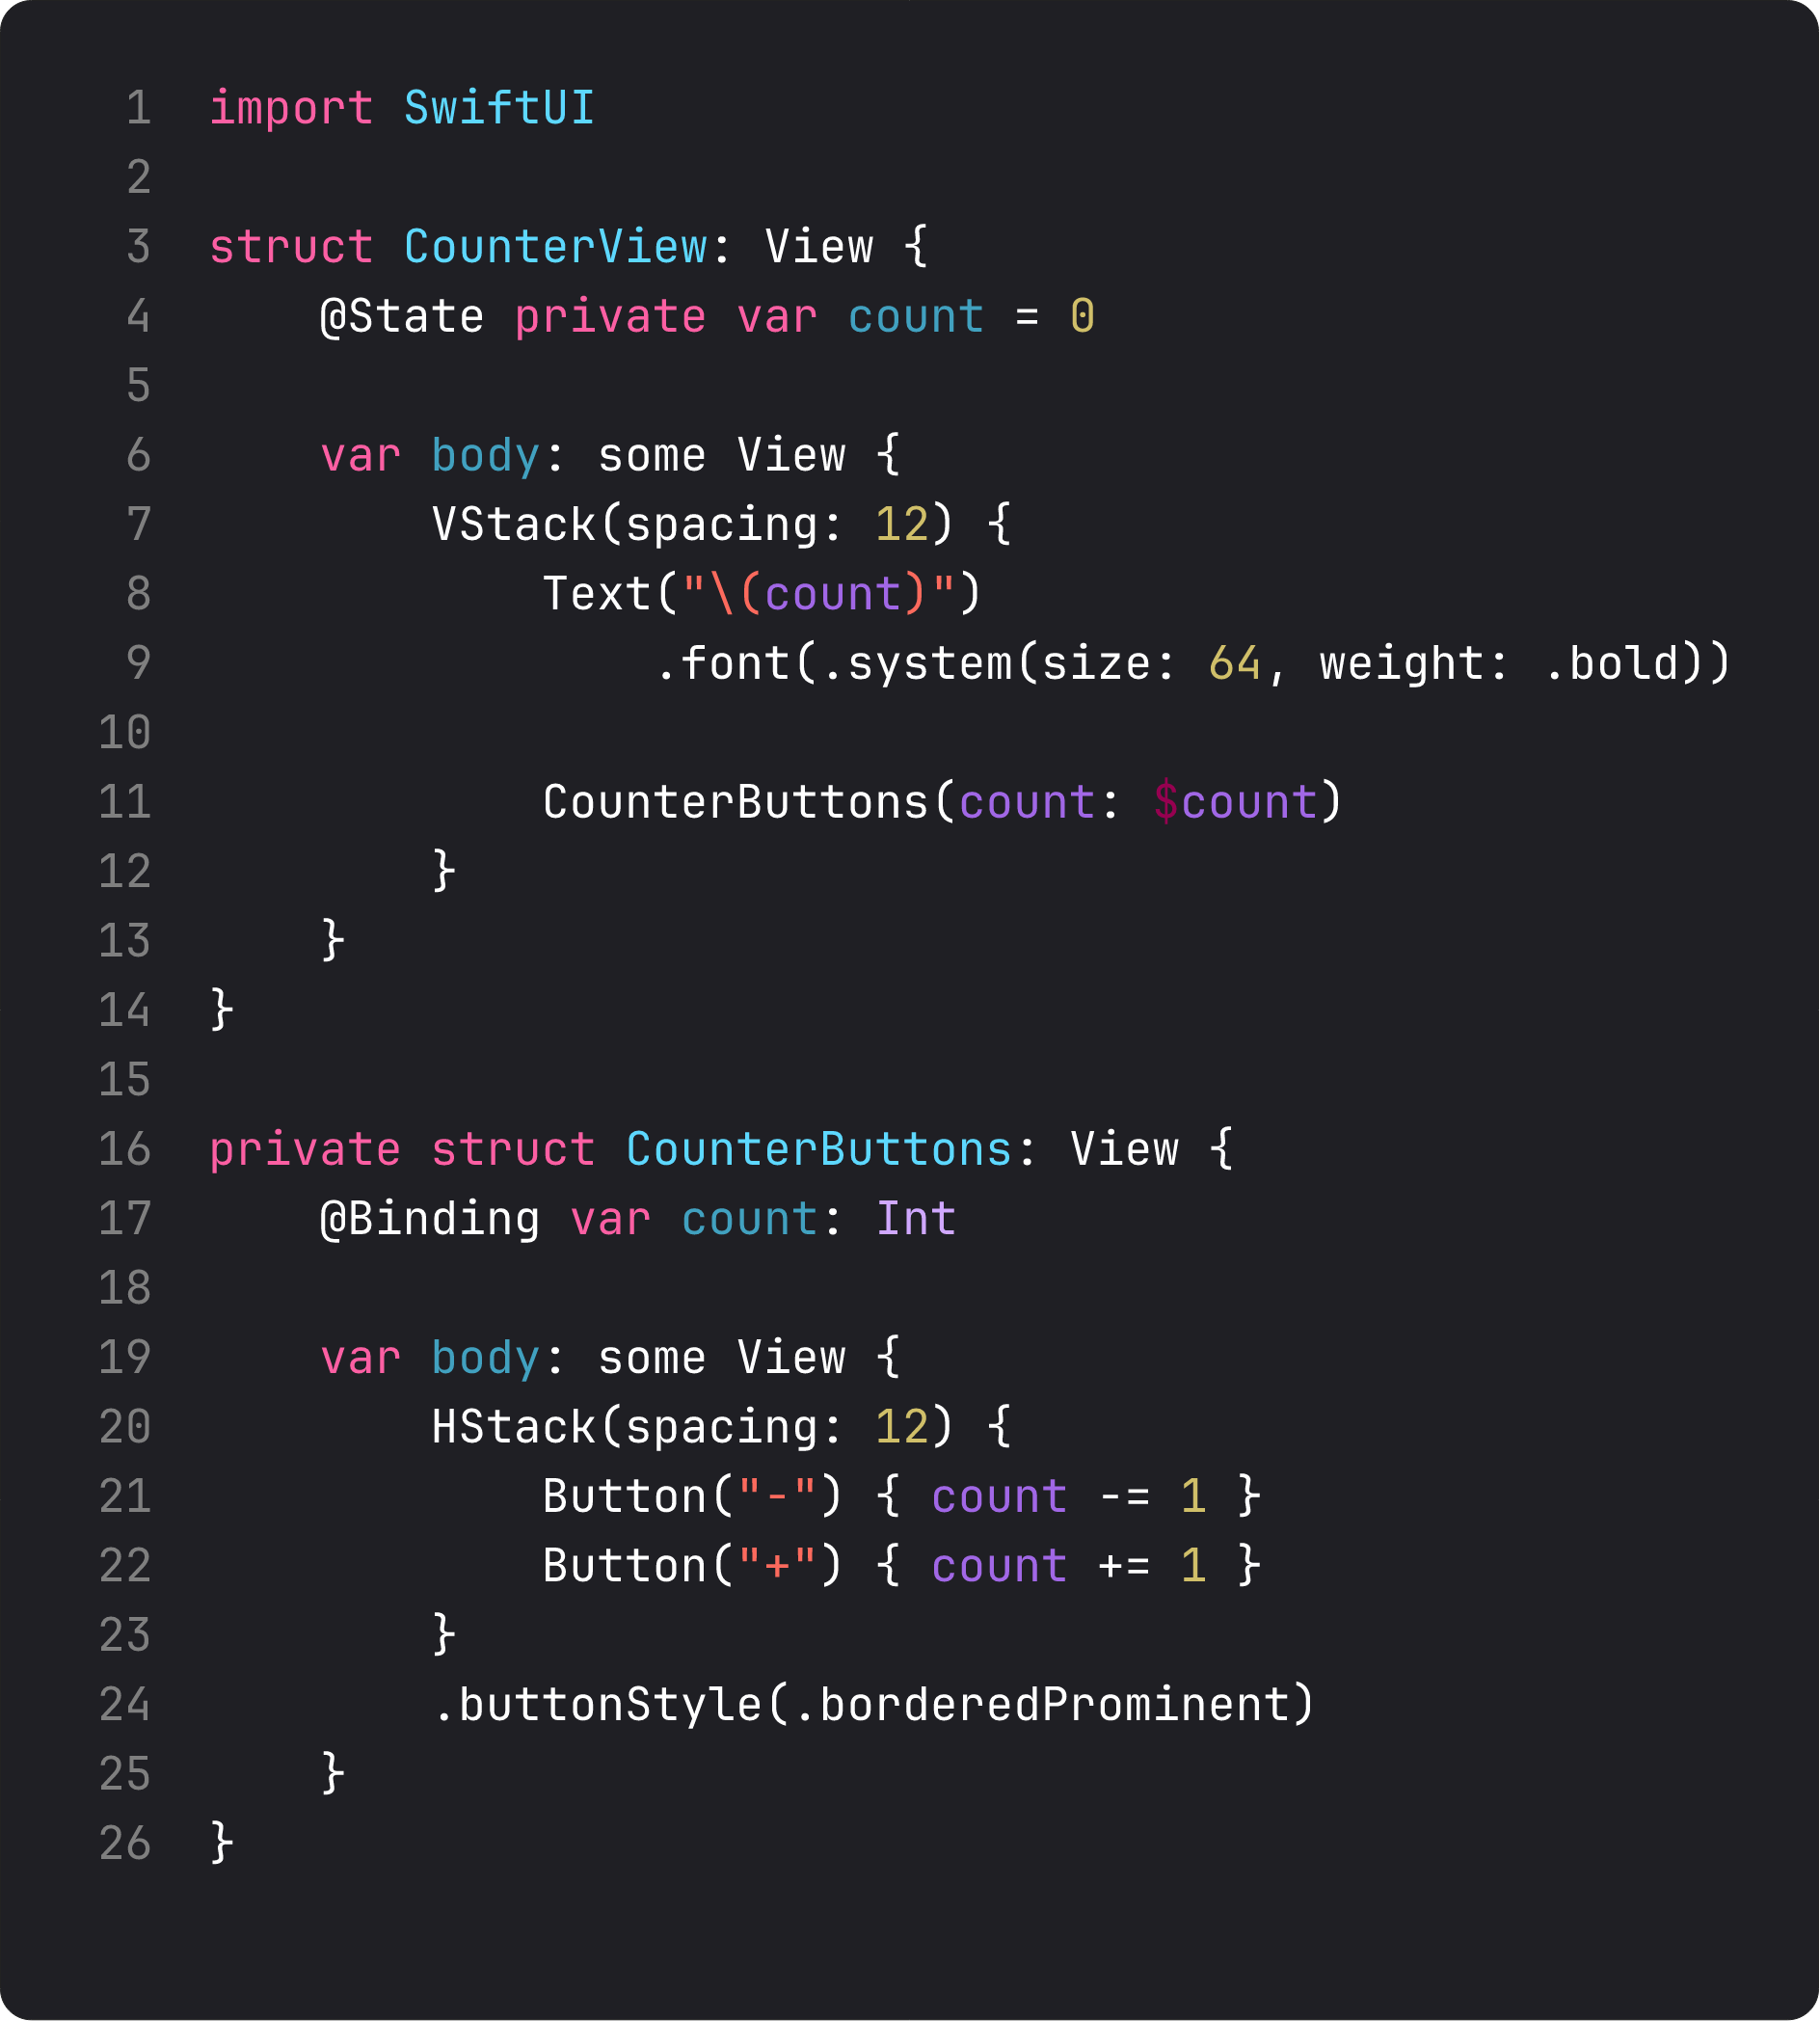
The pattern is consistent: the parent passes $count (with the dollar sign), the child receives count: Binding<Int> declared with @Binding. The dollar sign isn’t magic — it’s the projected value of the @State property wrapper, which produces a Binding.
Read those four lines bottom-up:
CounterButtonsdeclares@Binding var count: Int— “I will read and write someone else’s Int.”count -= 1andcount += 1look identical to direct mutation. SwiftUI handles the indirection.- The parent’s
bodyreadscountto render the number; SwiftUI knows the binding is the same value, so when the child mutates, the parent re-renders. privateonCounterButtons— the sub-view is internal to this file’s implementation.
SOLID flag: SRP — single responsibility. Before extraction, CounterView did three things: held state, rendered the number, rendered the buttons. After extraction, each view has exactly one job. The state holder owns the truth. The display reads it. The buttons mutate it. Each can be tested or replaced in isolation.
Three controls, three @Bindings
The point of @Binding clicks the moment you wire it to system controls. SwiftUI’s built-in controls all take a Binding<T> for their value — that’s how they communicate changes back up.
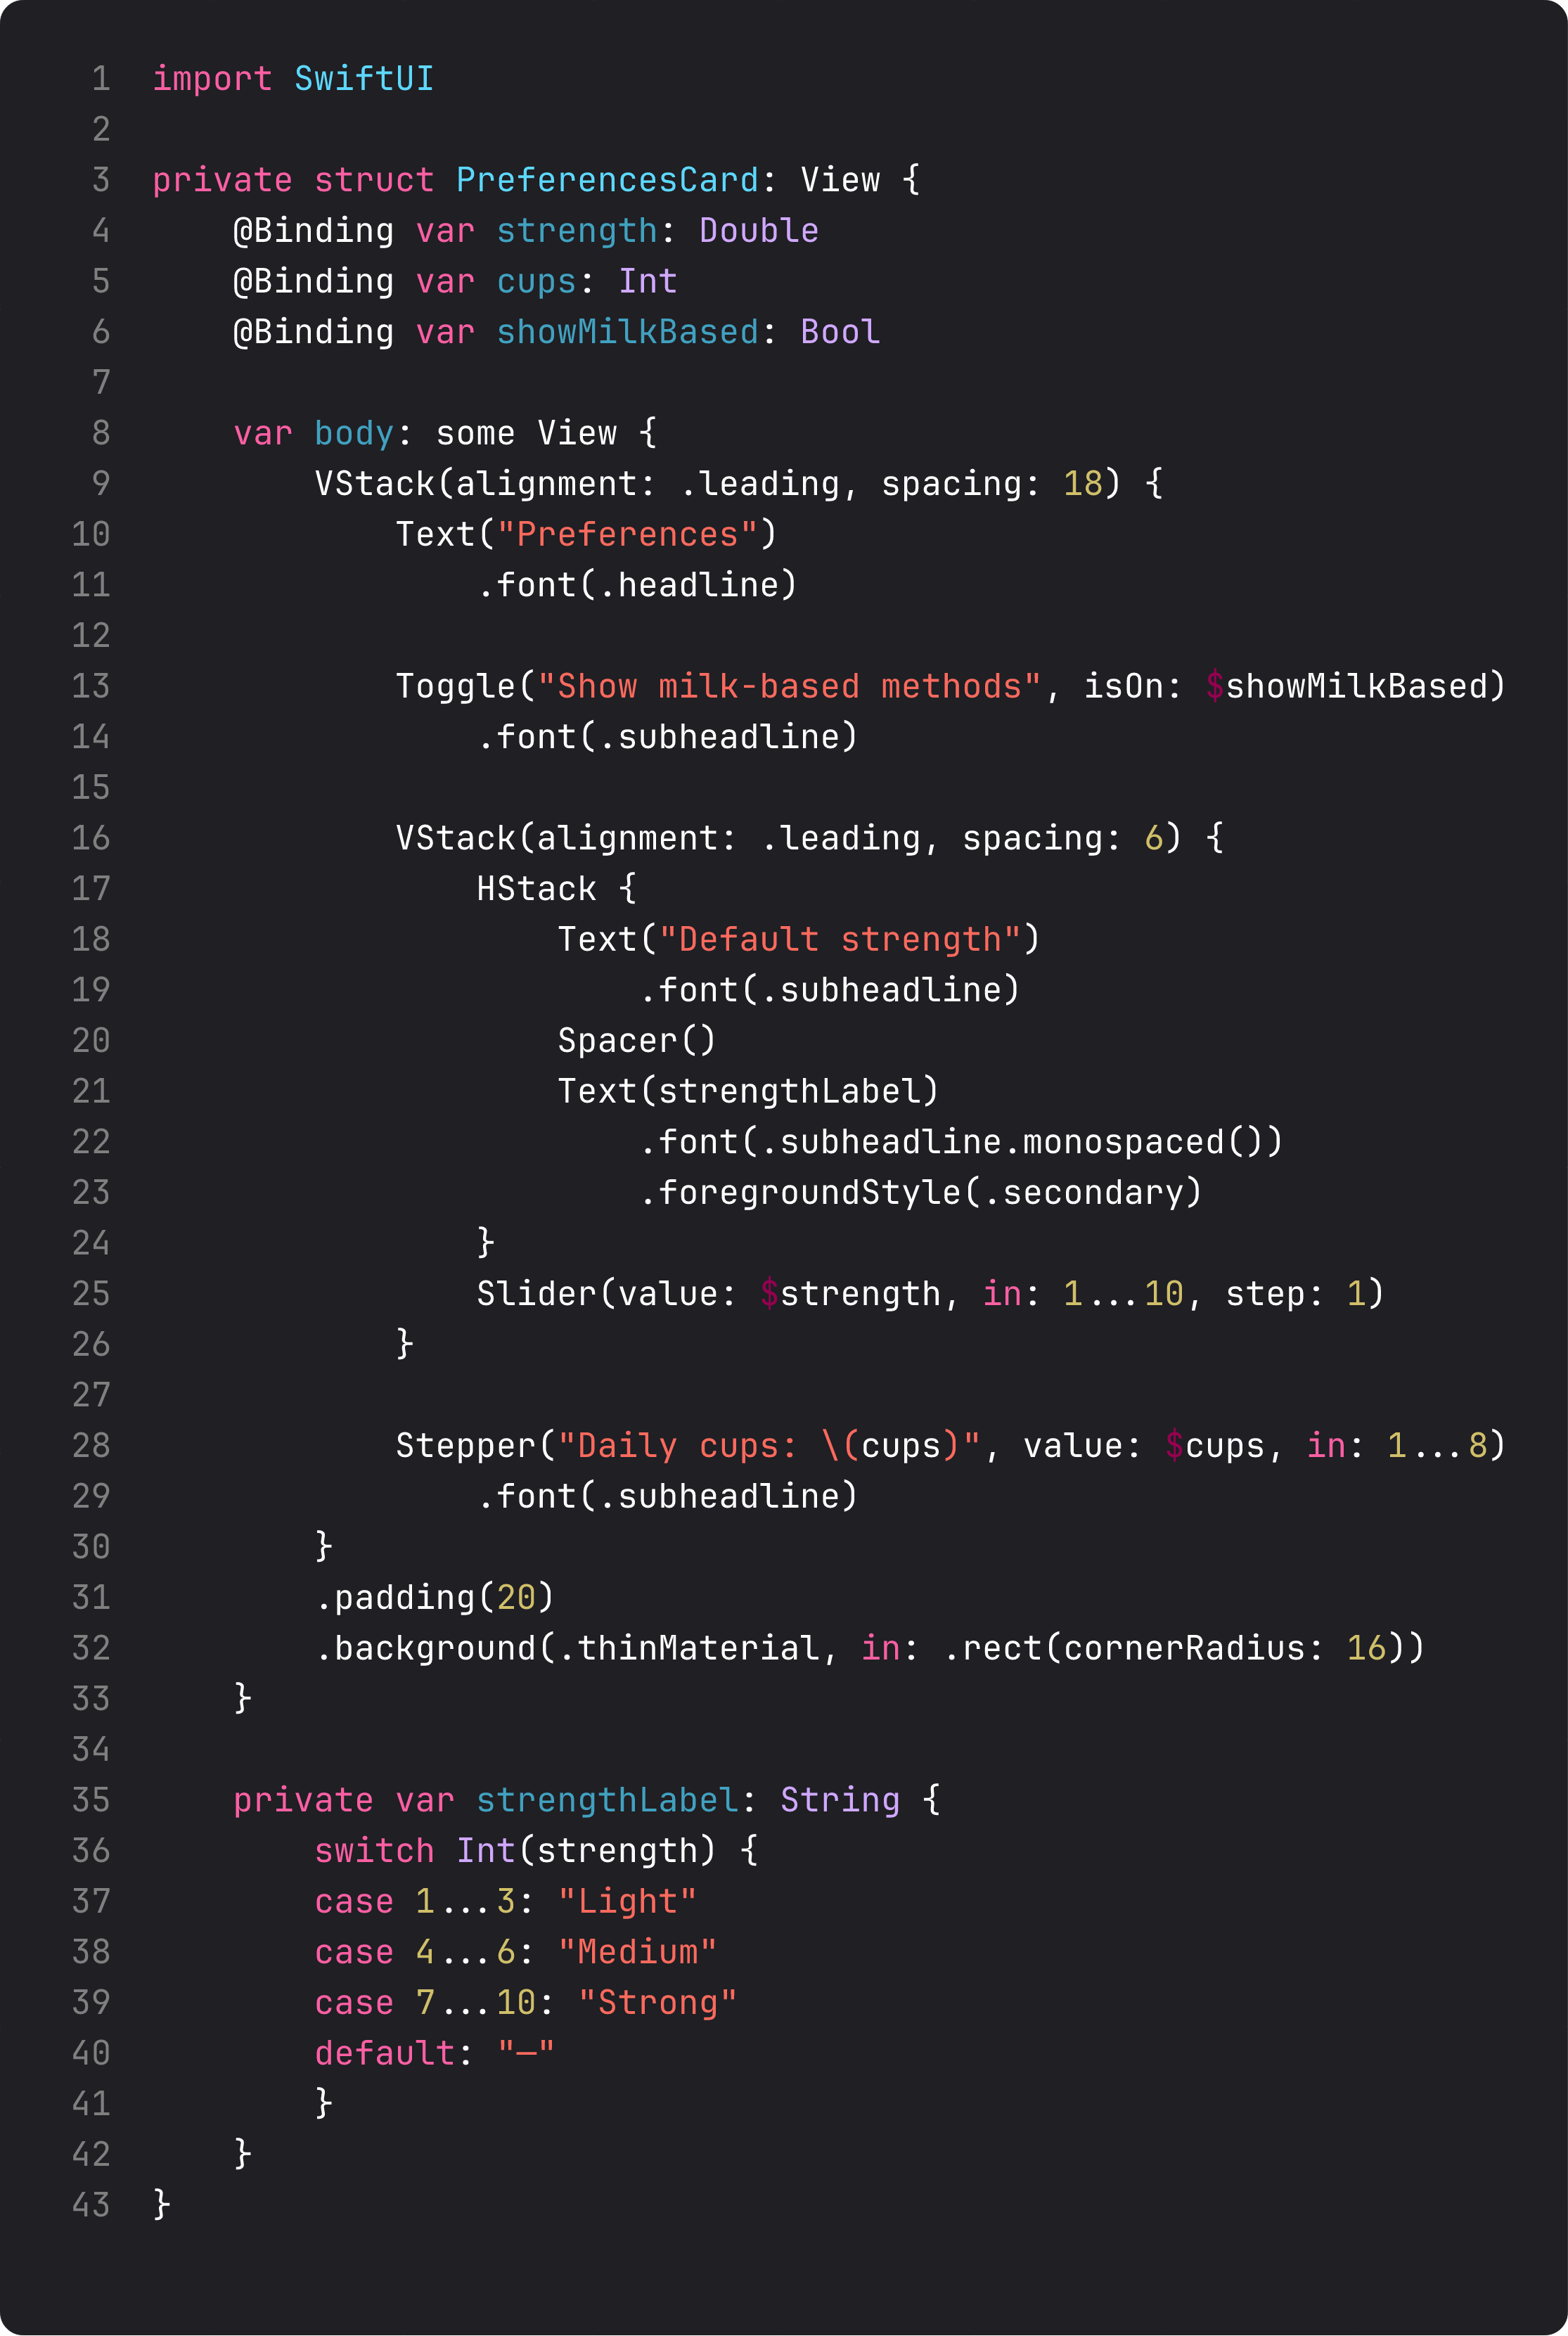
Three controls, three flavors of bound state:
Toggle("...", isOn: $showMilkBased)— bound toBool. Renders as the iOS switch. Tap toggles the value, which the parent’s@Statealready had access to.Slider(value: $strength, in: 1...10, step: 1)— bound toDouble. Thein:range is required;step:snaps to integer values. As the user drags, the binding updates continuously.Stepper("Daily cups: \(cups)", value: $cups, in: 1...8)— bound toInt. Plus and minus controls with a label. The label is interpolated from the same value the stepper writes to — so the text updates as you tap.
Notice that strengthLabel is a computed property, not state. It’s derived from strength. Don’t store derived values as @State — they go stale instantly. Compute them on read. Body re-runs are cheap (we covered why in lesson 1); your computed properties run inside that re-render.
This is the kind of detail that separates Coursera SwiftUI from production SwiftUI. Vibe-coded versions of this card almost always have a @State strengthLabel: String that gets updated in a .onChange(of: strength) modifier. That works, but it’s two sources of truth pretending to stay in sync. One source of truth, derived everywhere else. That’s the pattern.
A trap I see weekly: @State for static data
The opposite anti-pattern, also common:
struct ContentView: View {
    @State private var title = "Brew Log"
    @State private var subtitle = "Your daily coffee, logged."

    var body: some View {
        VStack {
            Text(title)
            Text(subtitle)
        }
    }
}
These strings never change. @State is for values that mutate. If a value never mutates, it’s just let title = "Brew Log" — or, more often, it’s a string literal inline in body. @State is not “the SwiftUI way to declare a property.” It’s a specific tool for owned mutable data.
When in doubt, ask: “Does anything in this view assign a new value to this?” If not, it’s not state. If yes, it’s state. There’s no third option.
What it looks like running
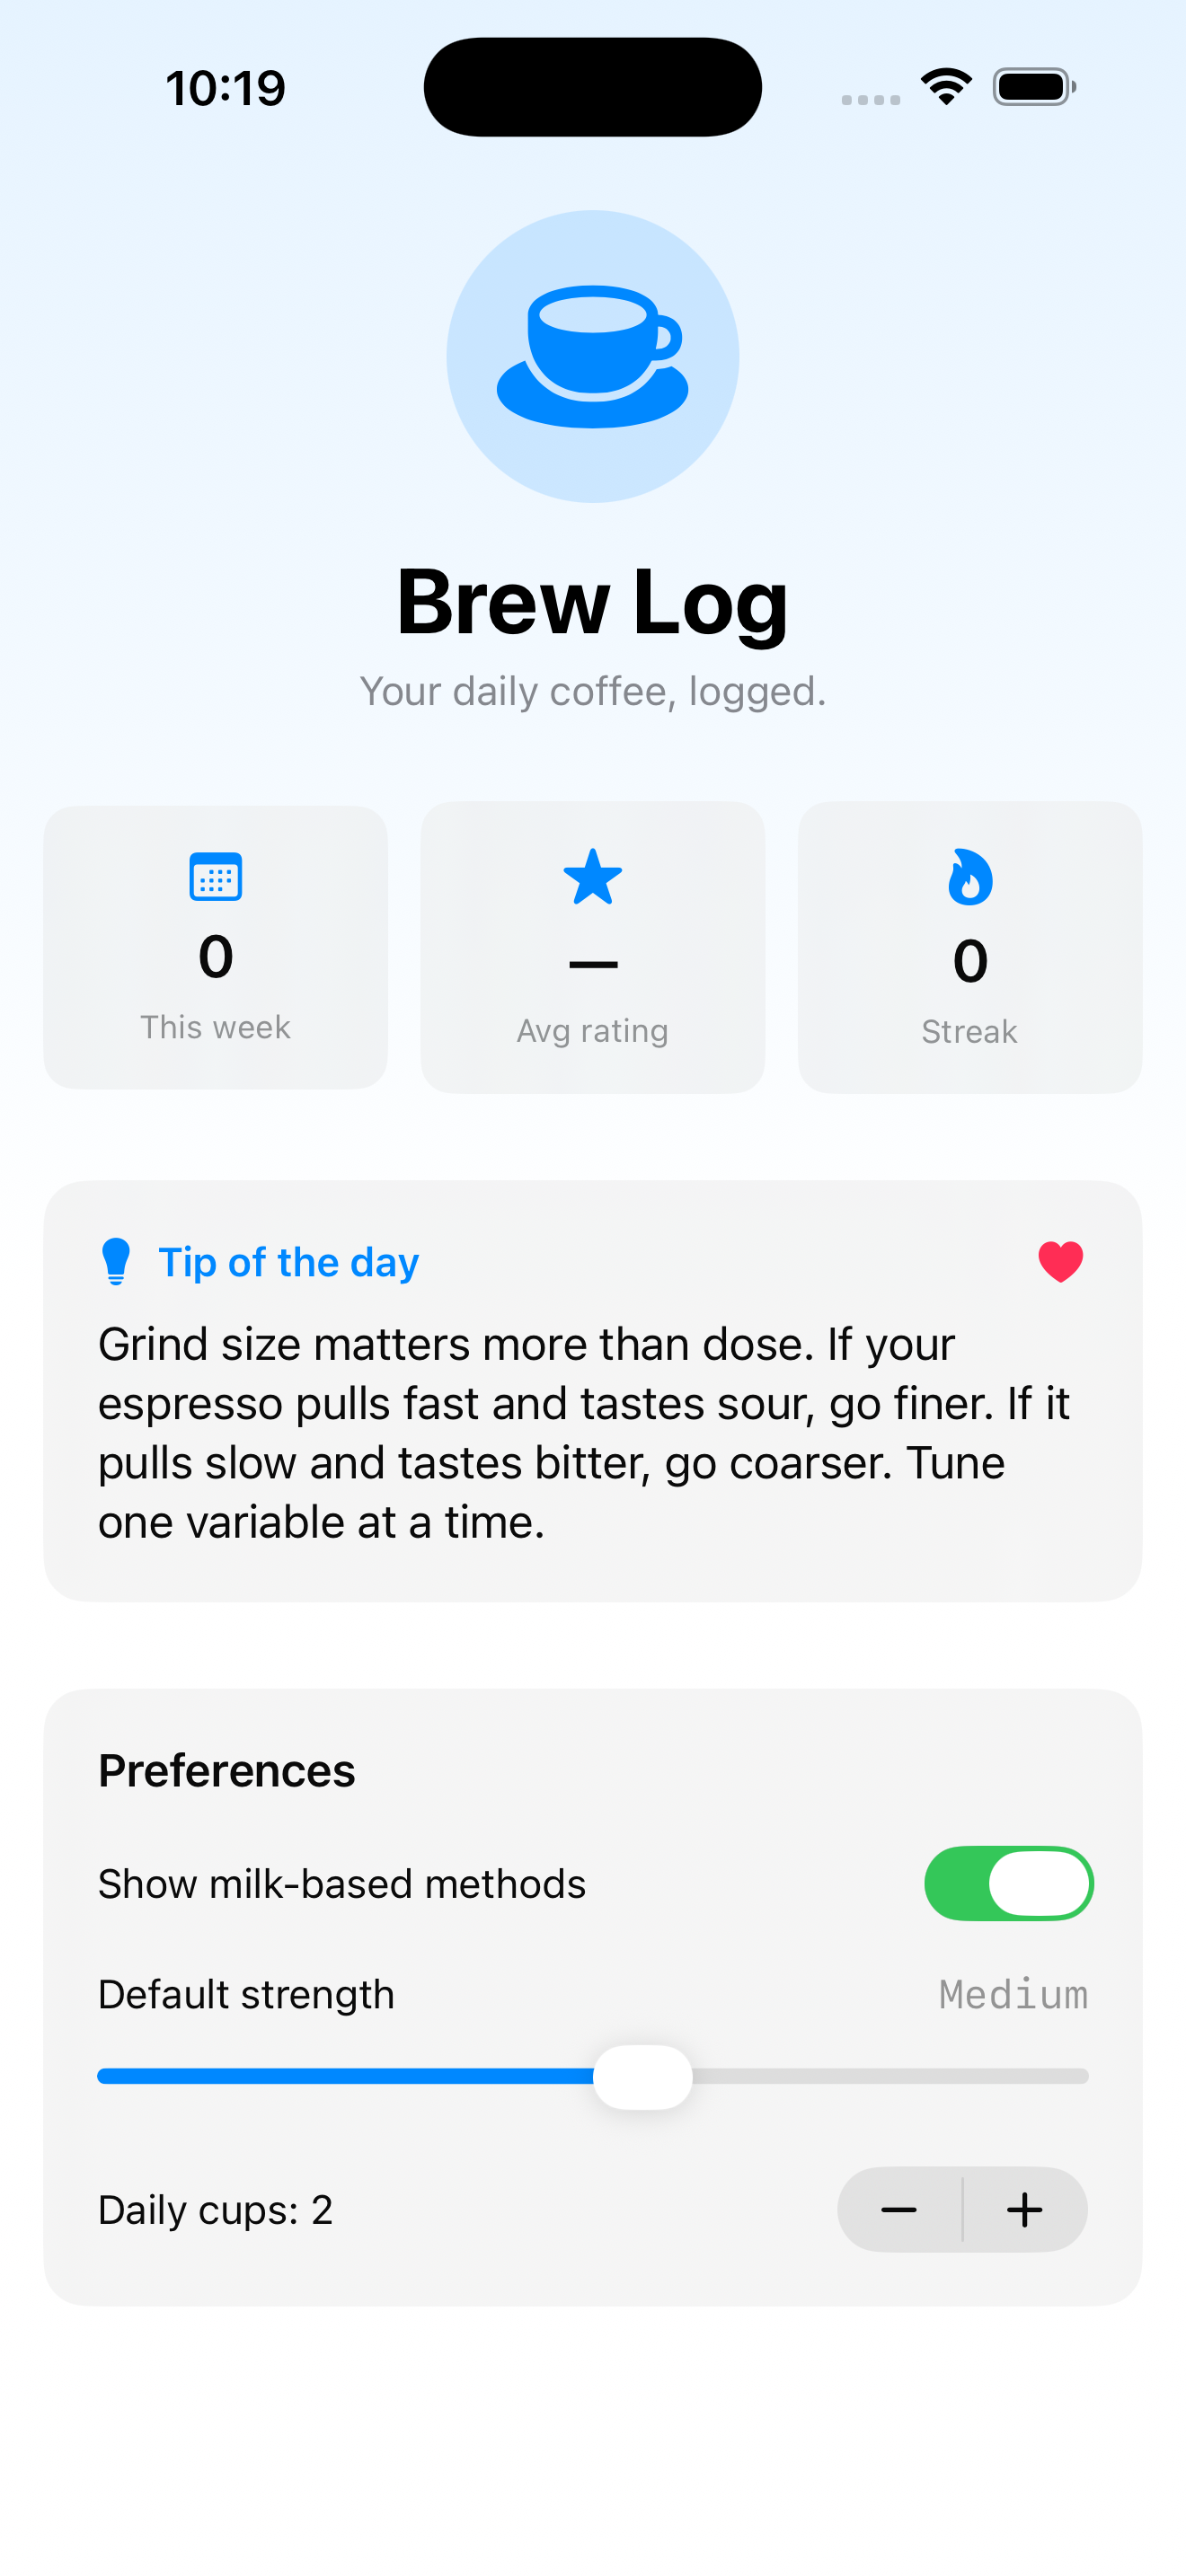
The video walks through the wiring: tap the heart on the tip card, scroll down, flip the toggle, bump the stepper. Every interaction routes through @Binding back to a single @State property in ContentView. One source of truth. Many views reading and writing it.
That’s the whole architecture. Internalize this and you’ll be writing SwiftUI for years without re-encountering data-flow confusion.
Takeaway
@State for what you own. @Binding for what you borrow. Always private on @State. Always derived values as computed properties, not stored state. The built-in controls take bindings — that’s how you connect them to your data.
If your view has more than three or four @State properties, consider promoting them to an observable model — which is exactly what we’re doing in the next lesson.
Next lesson: @Observable and @Bindable — Apple’s 2026 way of putting more structured state into a class so multiple views can share it without prop-drilling bindings through five layers.
NativeFirst Team
EditorialThe NativeFirst team — engineers and designers building native Apple apps and writing the courses we wish we had when we started.
Comments
Leave a comment