Navigation at Scale — NavigationPath, Routers, and Deep Links
NavigationStack was easy in Foundations because BrewLog had two screens. The pattern that worked there — value-based NavigationLink plus navigationDestination(for:) — keeps working for ten screens, twenty, fifty. What changes at scale is who controls the path.
Two patterns, in order of complexity:
@State path: NavigationPathowned by the parent view. Programmatic pushes happen by writing topath. Works great for one nav stack with handful of destinations. Pulse uses this today.@Observable Routerinjected via environment. Path lives in a class. Every view in the tree can push, pop, or pop-to-root by calling methods. Required when push triggers come from places that aren’t view code — push notifications, App Intents, deep-link URLs, share-extension actions.
By the end of this lesson Pulse pushes a MarketDetailView when you tap a row, and the toolbar has a “Top mover” button that pushes the first market in the watchlist programmatically. Same screen could be reached two different ways. That’s what the path binding buys you.
NavigationPath at the parent
The simplest scale-up from “value-based push” is to own the path explicitly:
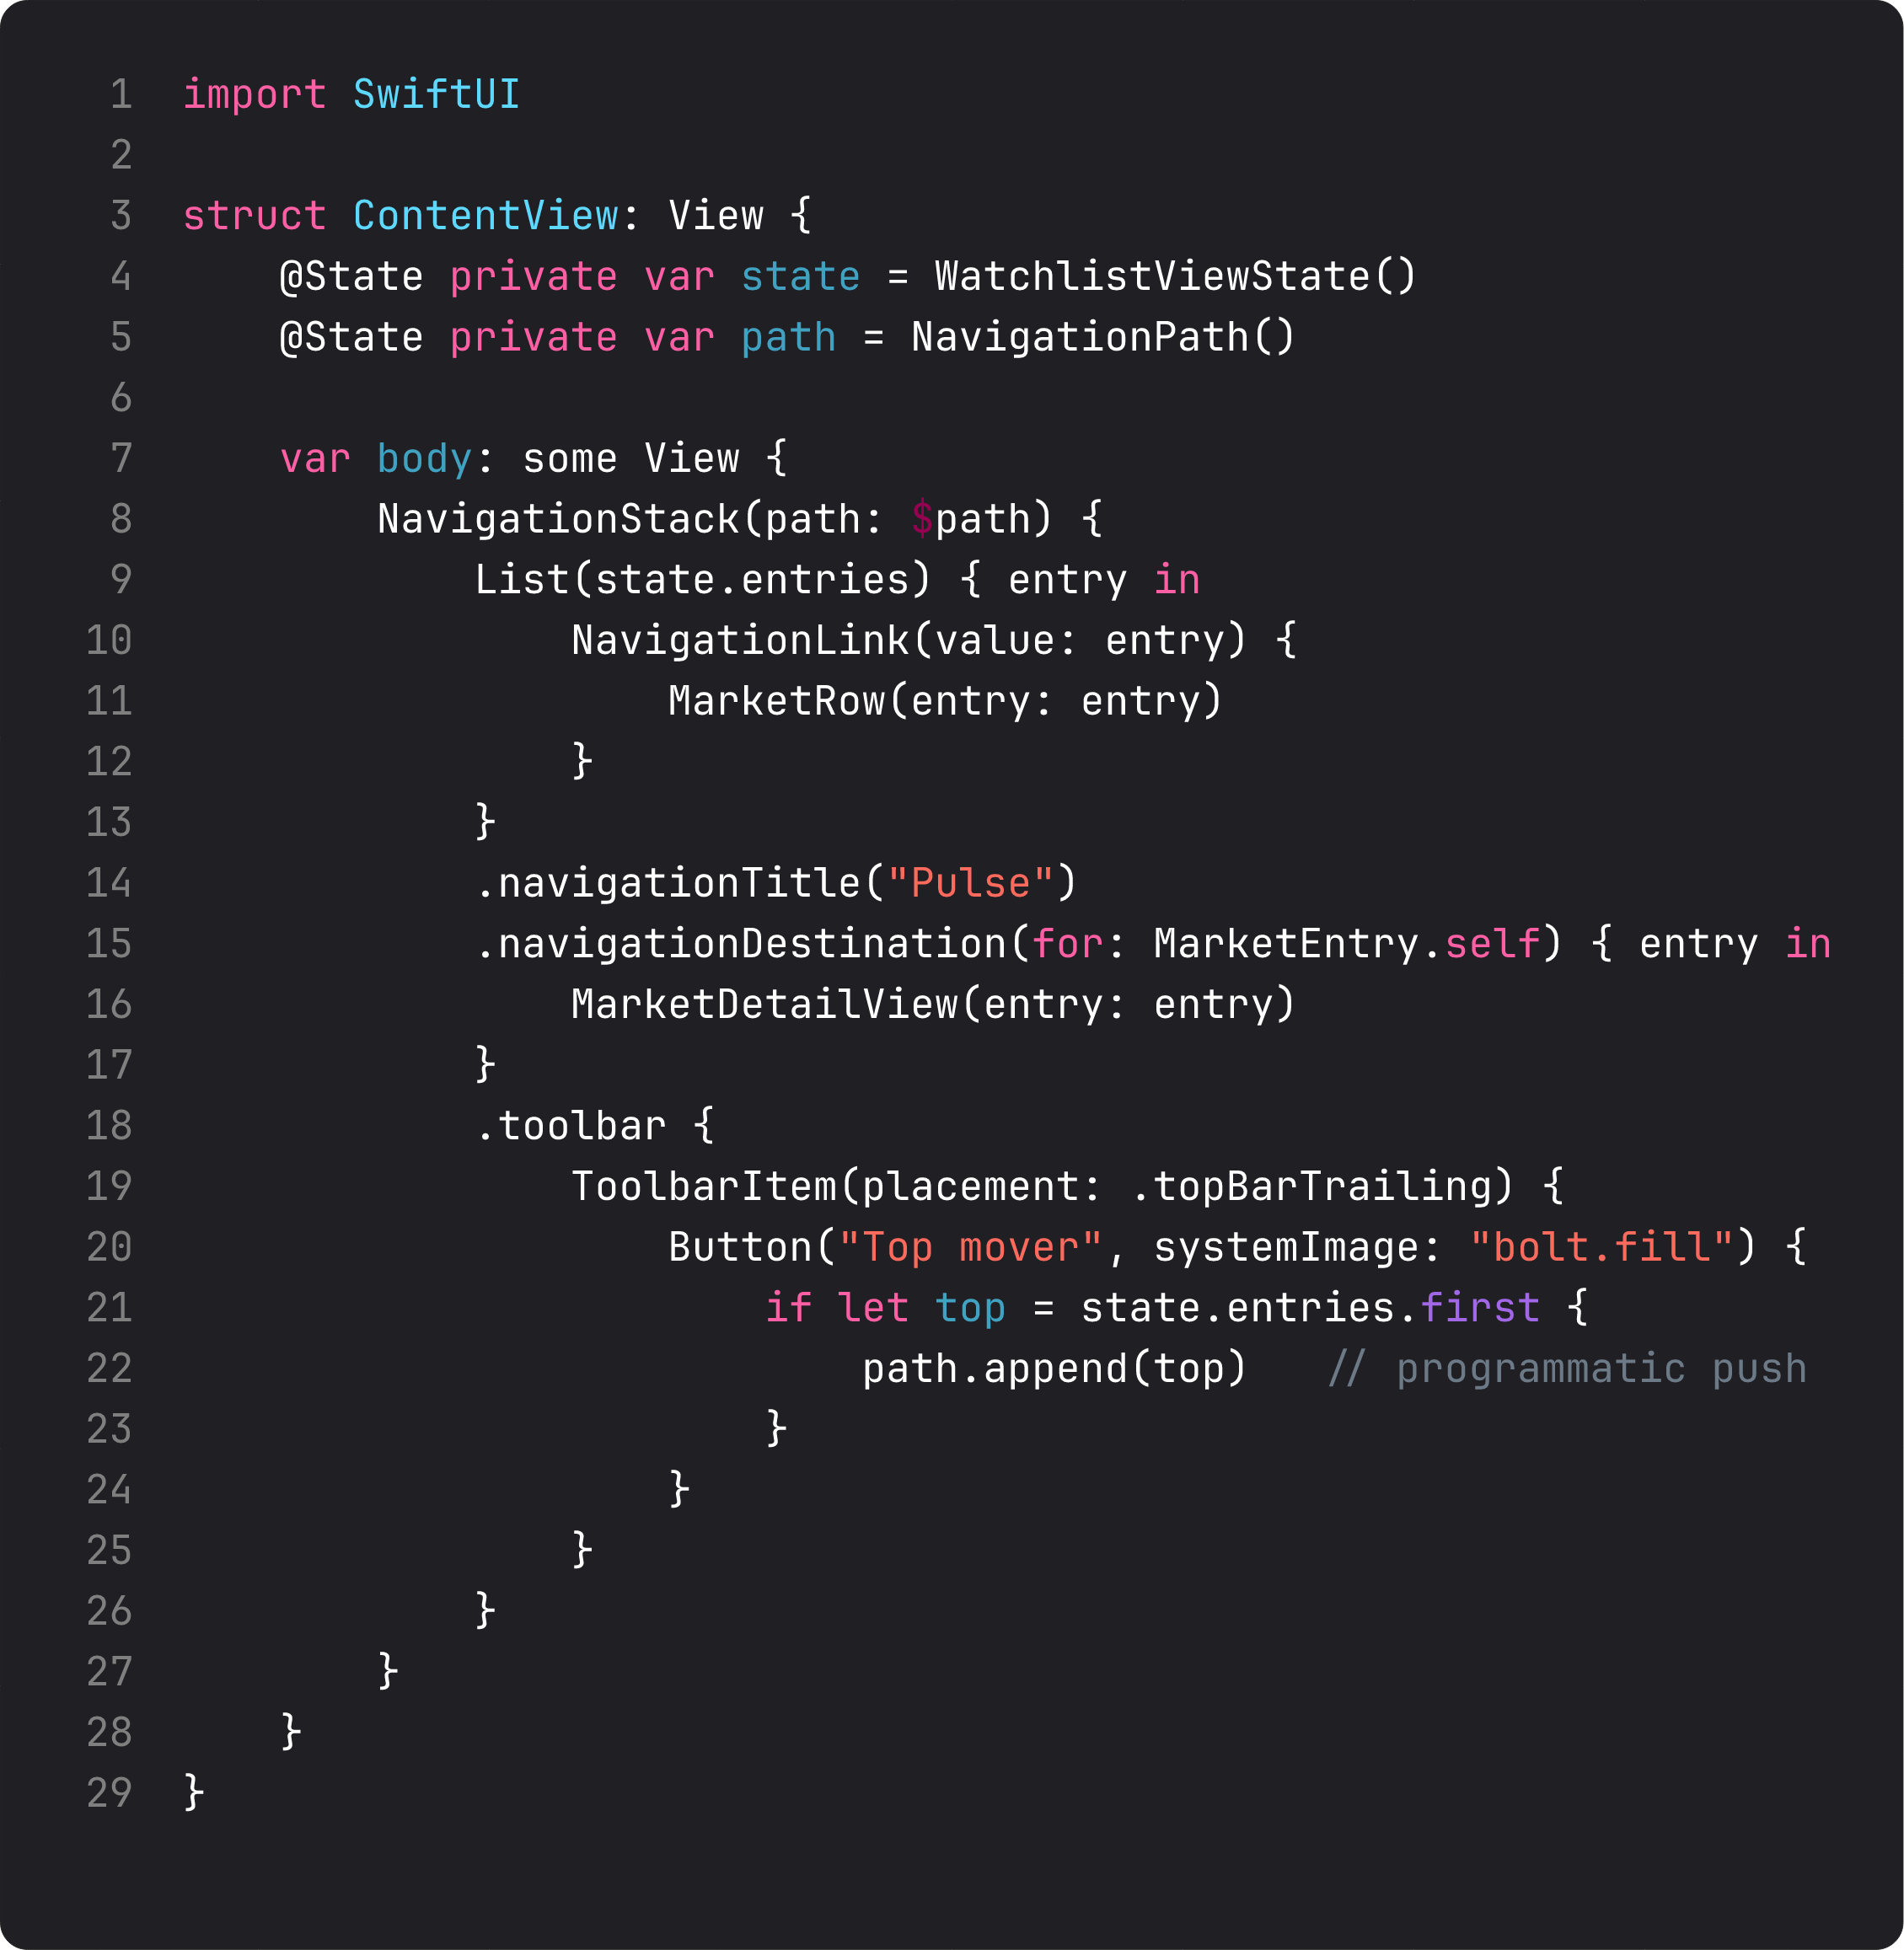
Three things change vs lesson 1’s “no path” version:
@State private var path = NavigationPath()— the path becomes view-owned state. Reset, append, and inspect it like any other value.NavigationStack(path: $path)— bind the stack to your state. SwiftUI keeps them in sync: tap aNavigationLink(value:)and the value gets appended topathautomatically; programmatically appending pushes the screen.- A toolbar button can
path.append(top)— that’s programmatic navigation. The button doesn’t need aNavigationLink; it triggers the same destination via the same value.
This is the pattern Pulse uses today. Three operations cover the common cases:
path.append(value)— pushpath.removeLast()— pop onepath = NavigationPath()— pop to root
NavigationPath can hold any Hashable value, including mixed types in one stack. That’s how a single NavigationStack handles both “open a market” and “open a category” without two separate stacks.
When @State path isn’t enough — the Router pattern
Three signals that you need a Router:
- A push needs to happen from outside view code (e.g.,
applicationDidReceiveRemoteNotification, an App Intent’sperform(), a deep-link URL handler). - Two unrelated views need to read the same navigation state without prop-drilling.
- You need to pre-populate the stack on app launch (e.g., resume to where the user left off).
The pattern is straight-up dependency injection:
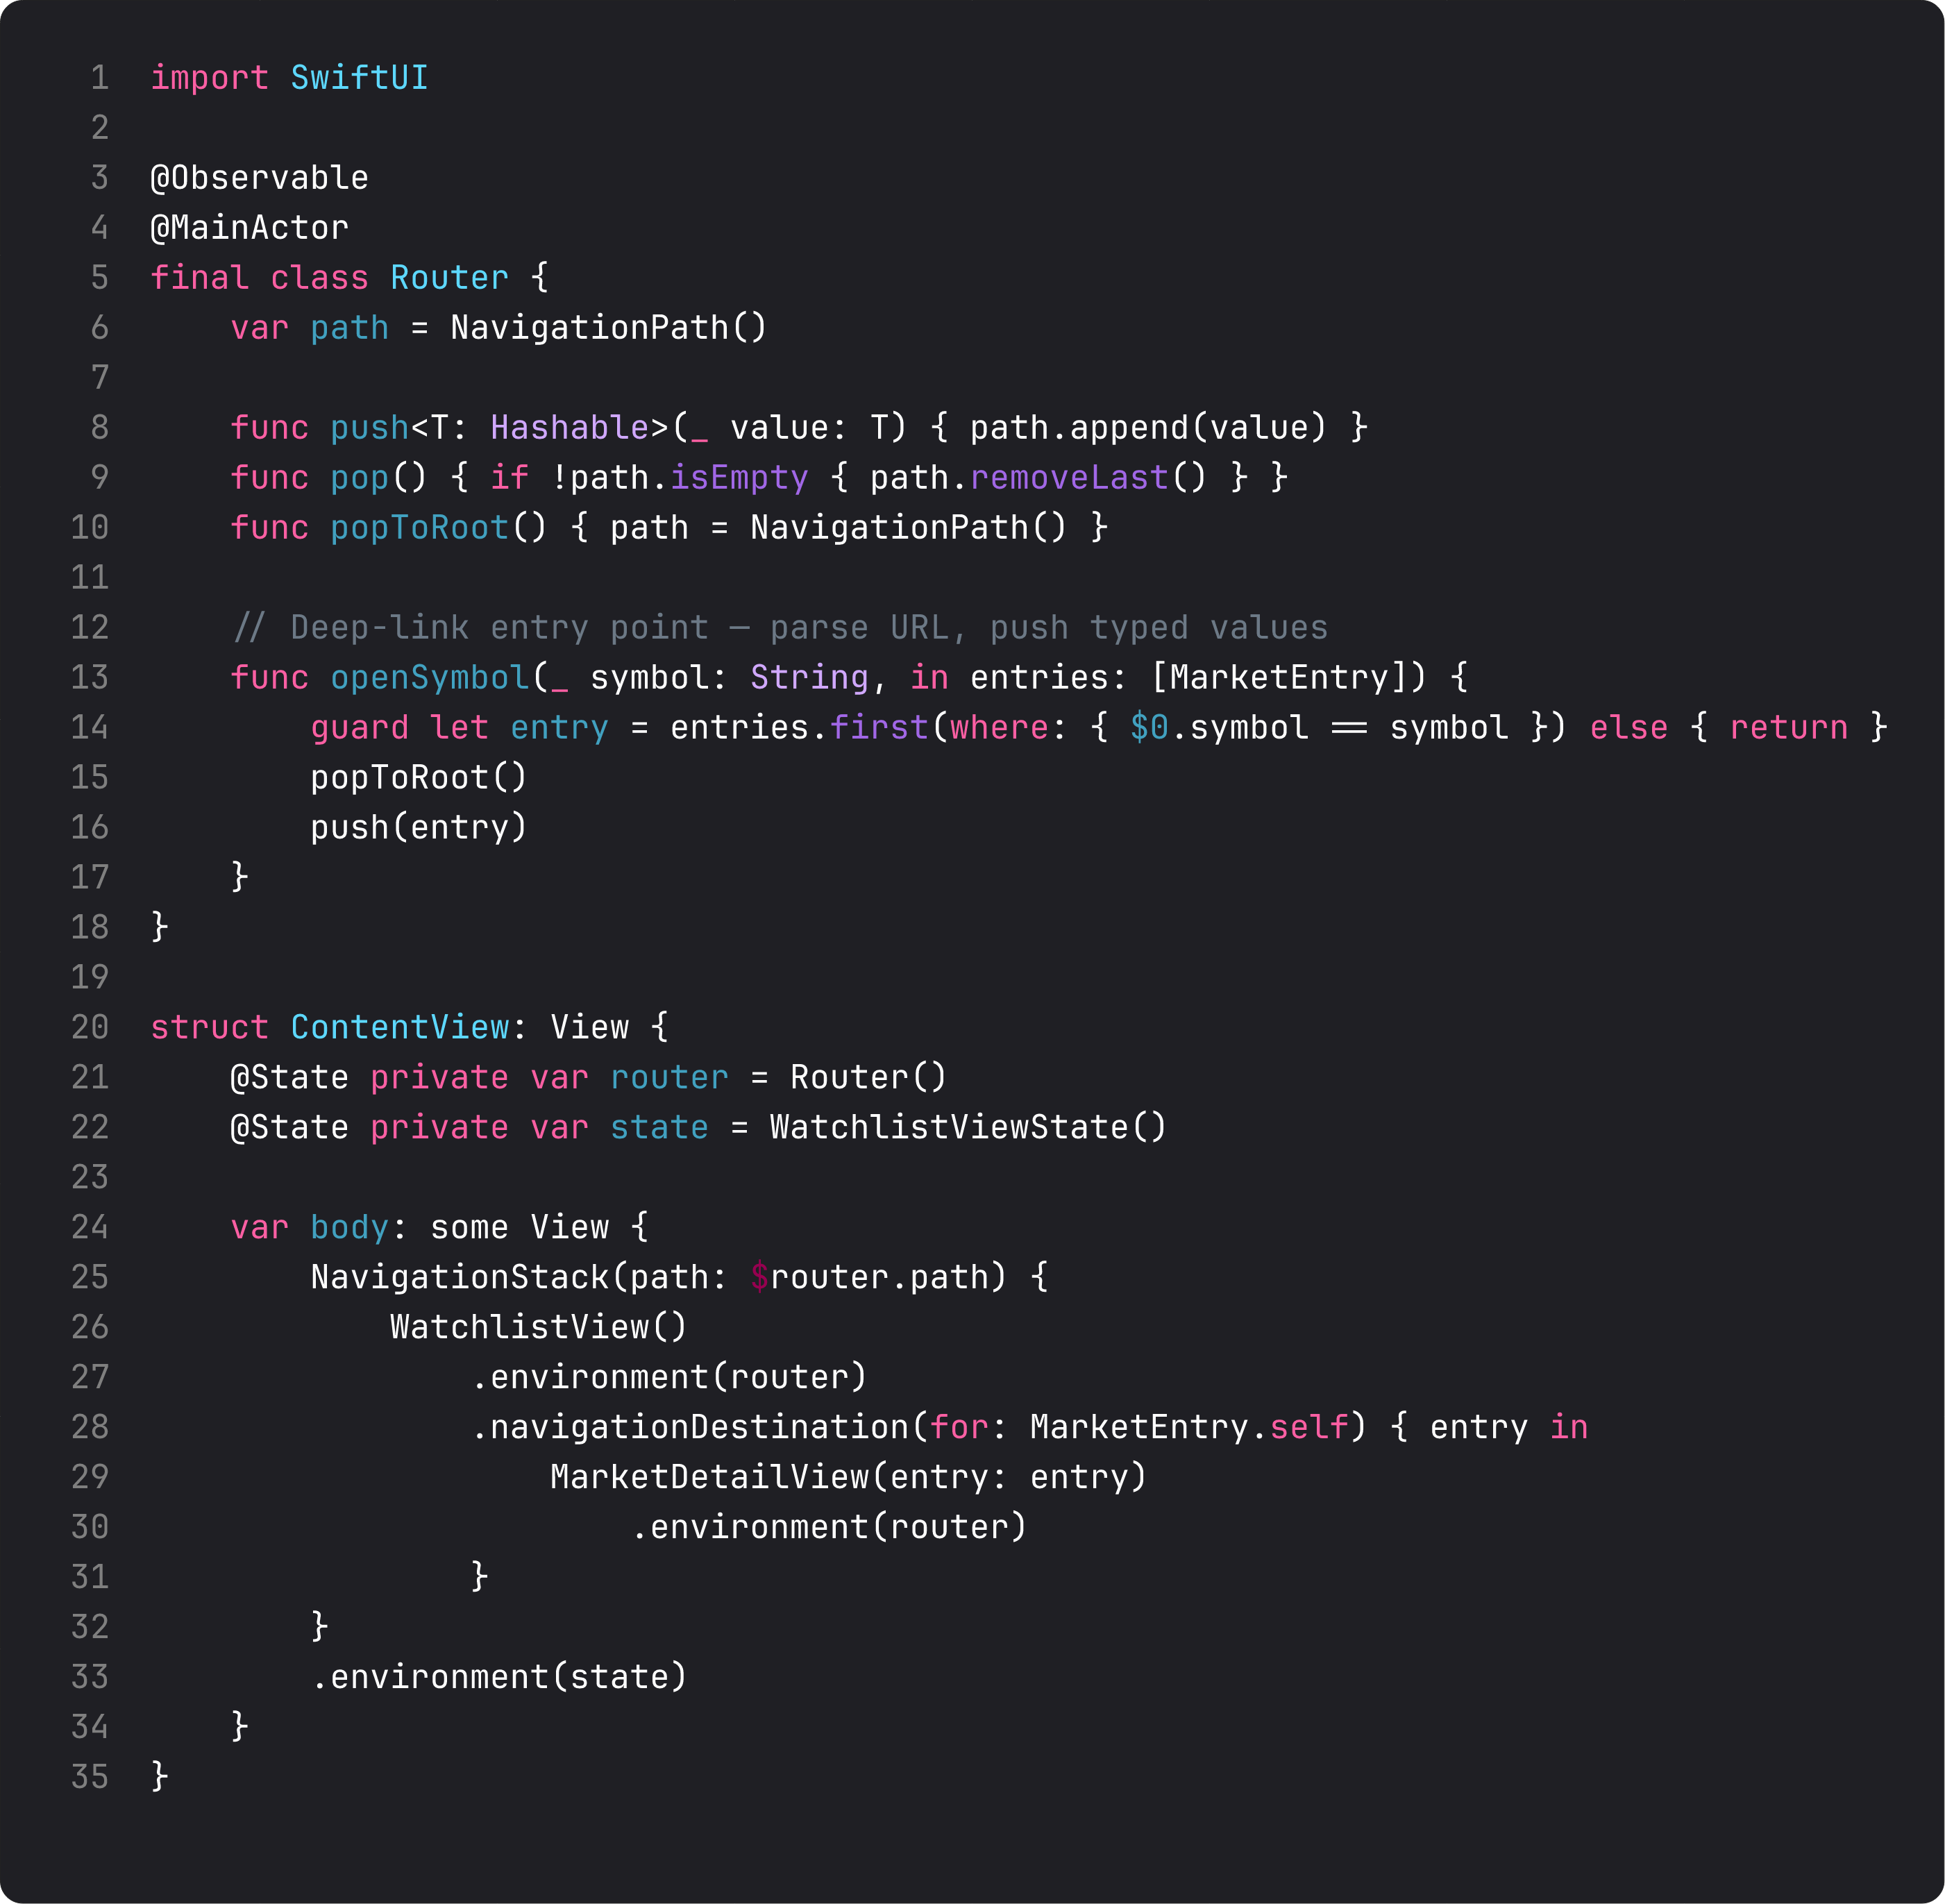
Three patterns to internalize:
@Observable @MainActor final class Router— same shape as the view-state class from lesson 1. It owns aNavigationPathand exposes typed methods. Views readrouter.path(via$router.path) and callrouter.push(...).- Type-safe push helpers —
push<T: Hashable>(_ value: T)accepts anything Hashable.openSymbol(_:in:)is a domain-specific helper for one specific push pattern. The router understands the app’s navigation grammar, so view code reads like English. - Inject via environment —
.environment(router)once at the root, then any view pulls it with@Environment(Router.self) private var router. Same DIP we covered in Foundations lesson 8 — the views depend on “a router,” not a specific instance.
For Pulse today this is overkill — we have one stack, no deep links, no notifications. We’d reach for it the moment we add a Share Extension that needs to drop the user into a specific market on tap. Ship the simple version first. Don’t pay for architecture you don’t have a problem for.
The detail view — receives a value, knows nothing about navigation
The destination view doesn’t know it’s being pushed. It just takes its value as a let and renders.
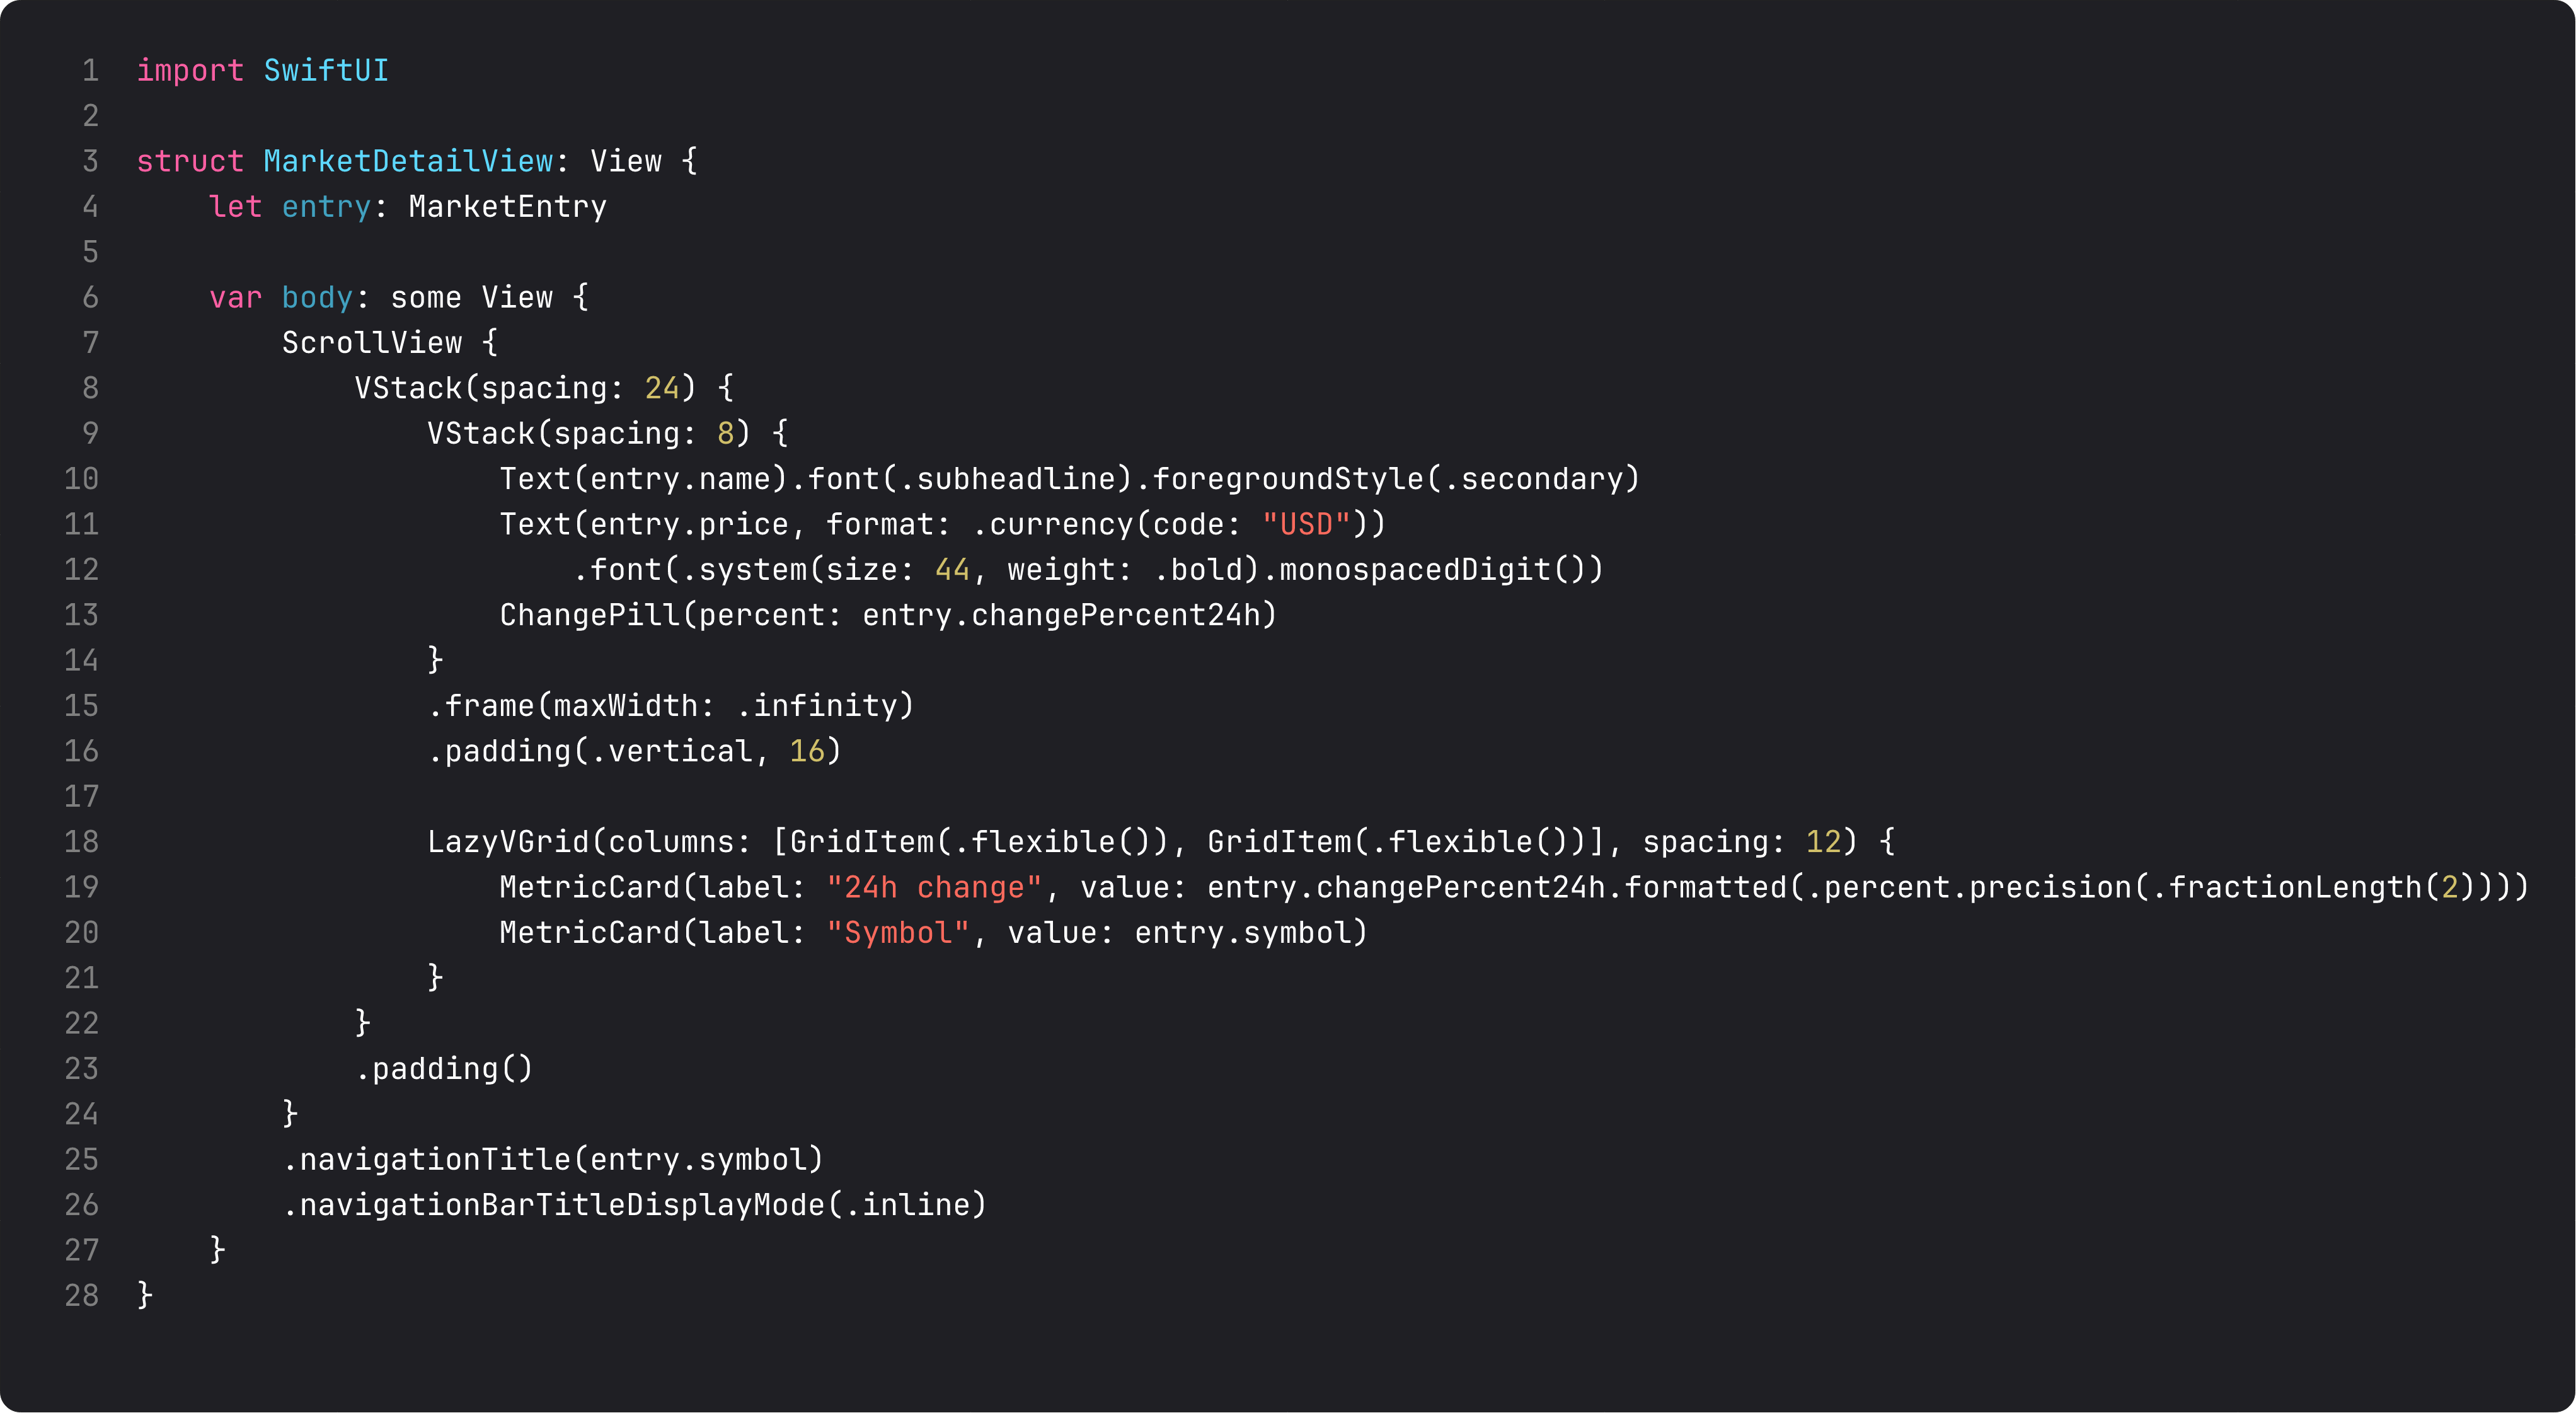
The detail view is a pure function of its input:
let entry: MarketEntry— the value comes from whoever pushed. The view doesn’t care if it was aNavigationLinktap, a programmatic push, a deep link, or a test fixture. That’s ISP applied to navigation — the view’s interface is “give me an entry, I’ll render it.”.navigationTitle(entry.symbol)+.inline— the nav bar shows the current symbol; the back button takes you to “Pulse” (the parent stack’s title). The system gives you back navigation for free.- Reuses
ChangePill— the small component we extracted last lesson. Same styling, same logic, two places. Composition pays off the moment you have more than one screen.
The action buttons at the bottom (Refresh, Open chart) do nothing yet — they’re placeholders for lessons 4 (networking) and 12 (charts). Putting the UI in place now gives the screen its final shape; we wire the actions later.
A trap I see weekly: navigation tied to view state
The vibe-coded version of “open detail”:
@State private var selectedEntry: MarketEntry?

var body: some View {
    NavigationStack {
        List(state.entries) { entry in
            Button { selectedEntry = entry } label: { MarketRow(entry: entry) }
        }
        .sheet(item: $selectedEntry) { entry in
            MarketDetailView(entry: entry)
        }
    }
}
This works. Two issues:
- It’s a sheet, not a push. The user expected drill-down navigation (because list → detail is the iOS expectation). They got a modal. Subtle but wrong.
selectedEntryis a redundant binding.NavigationPathalready does this — you don’t need a parallel state machine. Two sources of truth → eventually they disagree.
The right pattern is the one in this lesson: NavigationPath owns the navigation state. Pushes go through it. The list pushes via NavigationLink(value:). The toolbar button pushes via path.append. Both end up at the same destination, both update the same state. One source of truth for “where am I in the app.”
What changes at scale
Three navigation rules that show up at 20+ screens:
- Each tab has its own NavigationStack with its own path. Don’t try to share one path across tabs — switching tabs would reset hierarchies.
- Don’t rely on the path for cross-feature state. “Did the user save the brew?” is data, not navigation. Save it in the model, then pop. Don’t encode “saved” as a path entry.
- Deep links produce a path, not a sequence of operations. Parse the URL into a typed
NavigationPath, assign it. SwiftUI animates the resulting screen change. Don’t push-pop-push to “simulate” a deep link.
ThinkBud’s import flow exposes a deep link from the share sheet. Parsing the incoming URL produces a one-element NavigationPath with the freshly-created import as the value, and assigns it to the router. The user lands on the right screen with proper back navigation, no animation hacks needed. That’s the payoff of typed paths.
What it looks like running

The video taps a row to push the detail (back to the list), then taps the bolt-icon “Top mover” toolbar button to programmatically push to BTC’s detail. Same destination, two trigger paths, one navigation state.
The detail screen has placeholder Refresh / Open chart buttons — wired in lessons 4 and 12.
Takeaway
NavigationPath is the source of truth for “where am I.” Bind it via @State for simple cases; promote to an @Observable Router when navigation needs to fire from outside view code. Detail views take values, know nothing about how they got pushed. One stack per tab, deep links assign paths.
Get this right and you can ship 30 screens without writing a single navigation hack.
Next lesson: networking. We replace Pulse’s hardcoded sample data with real prices from a public markets API, learn URLSession + async/await, and start modeling errors as types.
NativeFirst Team
EditorialThe NativeFirst team — engineers and designers building native Apple apps and writing the courses we wish we had when we started.
Comments
Leave a comment